This post is about adding SVG export functionality to your P5 and vanilla JS (using the rendering context) sketches. If you want to import SVG files into your P5 sketch and need some help, then check out this post:
Otherwise read on!
Preamble
Here's a bit of context. Last month I released my token Blöck on editART, and its reception was stellar!
Blöck out! 🎉 #editart
— Ahmad Moussa || Gorilla Sun (@gorillasu) April 10, 2023
Thanks everyone for collecting! 🙌🙏 pic.twitter.com/DkRwIHtvqU
After all editions had found a new home in their respective collectors' wallets and the dust had settled, I got some heartwarming Twitter mentions where people shared their co-creations.
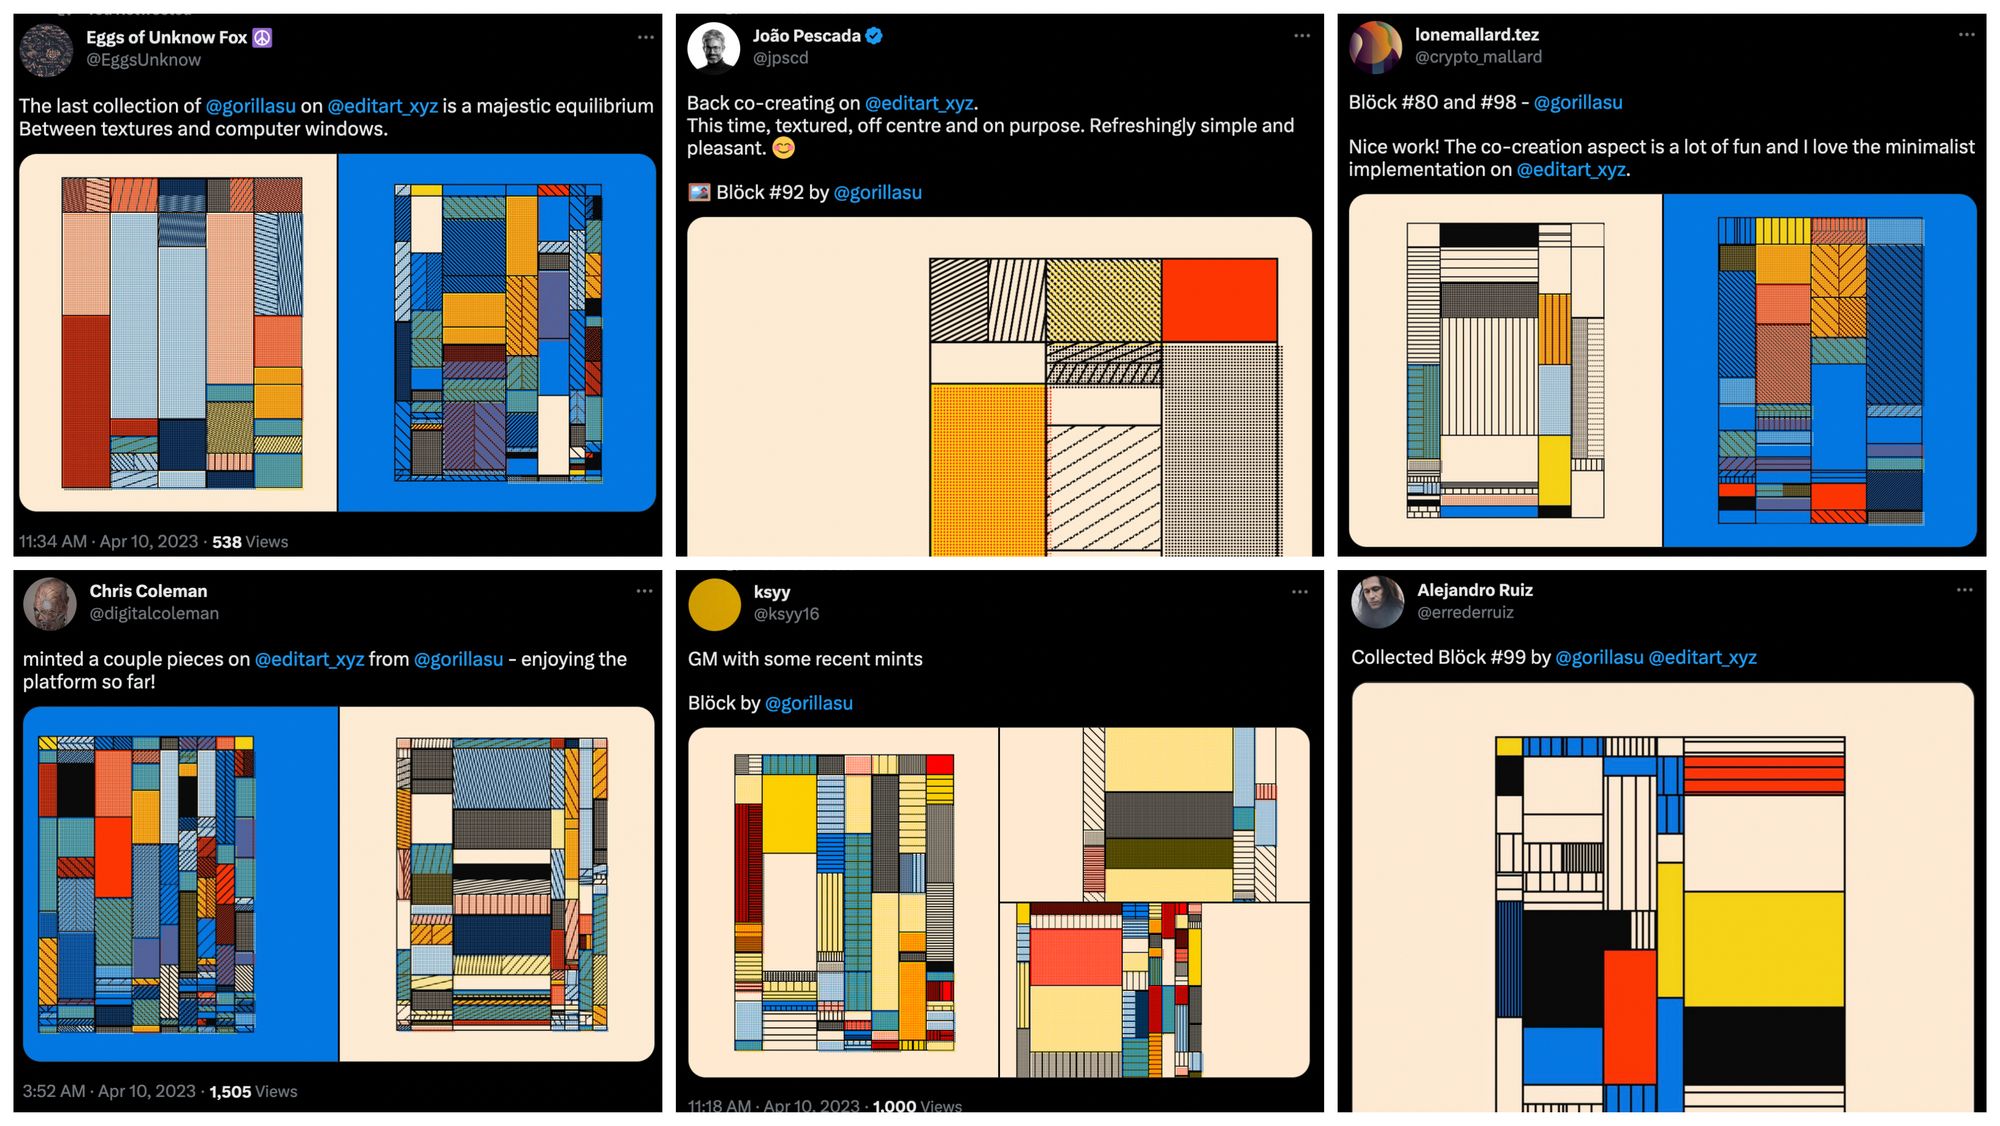
One of them was by Marius Watz, where he states that the token could have been close to perfect if it would have had the functionality to export SVGs:
Picked up these three beauties from @gorillasu's Blöck series on @editart_xyz this weekend. Loving the tight composition and easy experimentation. (SVG export would have been perfection.)https://t.co/PRnupA7QqZ pic.twitter.com/lvFhZ6AqhC
— Marius Watz (@mariuswatz) April 11, 2023
Feedback like that is incredibly important to me. I promptly added the request to the top of my to-do list and started looking into it. I've actually been meaning to figure out how-to-SVG since last year when I worked on a token with Pouya, but never got back around to it. Well, no better time than now!
The SVG format has several advantages to normal PNG, JPEGs and other raster based encoding formats:
- It is resolution agnostic. It can be scaled to any size without loss of resolution.
- It is a lossless format, and usually come with small file sizes.
- It can be used to plot tokens, which is probably the most popular use-case.
- Has access to SVG filters which can achieve cool effects.
All of these qualities make it an attractive format to add to your project's list of possible exports. If you're familiar with the SVG format and simply want a quick answer on how to do it, then you can directly jump to the last two sections of the post. Otherwise, keep on reading!
On SVGs
Let's first discuss the SVG format a little, and have a look at how these scalable vector graphics function internally.
What is the SVG format
I already wrote a little about the SVG format in a previous post of mine Working with SVGs in P5 (the post I linked at the very top):
SVG stands for 'Scalable Vector Graphic', which is immediately revelatory of two important properties: scalability and resolution independence. Unlike other pixel based formats, being Vector based, SVGs are not bound to an underlying pixel raster and can thus be scaled to arbitrary sizes, without loss of quality.
Vector graphics aren't graphics per se; under the hood, they're made out of a string of instructions that describe the graphics a browser would render, if we were to pass it these instructions. In turn, the browser translates these instructions into a graphic that can be displayed on a webpage. These instructions are usually written in the XML markup language.
Unlike proper programming languages, like Javascript, Markup languages can't be used to achieve anything functional. Instead, markup languages are used to control the structure and formatting of the content. In the case of SVGs, XML allows us to describe 2D graphics.
Here's an example of XML code that describes a simple SVG:
<?xml version="1.0" encoding="UTF-8"?>
<svg xmlns="http://www.w3.org/2000/svg" width="100" height="100">
	<circle cx="50" cy="50" r="40" fill="red" />
</svg>
At first glance, XML looks very similar to HTML. Even though both function on the basis of tags, there are some differences between them. HTML is generally used to structure the content and layout of web pages. In contrast, XML's main aim is the description of data. Additionally, XML allows the creation of custom tags, whereas HTML has a predefined number of tags.
The above example shows the basic structure of an SVG where we're drawing a simple 50x50 red circle in a 100x100 viewport. There's a couple of things happening here:
- The
<?xml>declaration specifies the version of XML being used and the character encoding. This tag isn't always required but it's good practice to include it for things to function properly. - The
<svg>element is the root element of the SVG file and defines the width and height of the SVG viewport. The xmlns attribute is used to specify the namespace and is important to include here, it allows us to make use of a lot of useful tags for the purpose of drawing different shapes. We'll talk more about namespaces in a bit. - The
<circle>element defines a circle with a center point at (50, 50) and a radius of 40 units. Thefillattribute specifies the color of the circle as red.
Now that we know what an SVG looks like behind the scenes, let's have a look at some of the methods to actually display SVGs on a webpage before we dive into the more complicated task of creating an SVG programmatically.
Displaying an SVG on a Webpage
There's a couple of different ways with which you can conjure an SVG onto your web page👇
Inline SVG
The easiest method is probably the <svg> tag that was introduced with html5, and which should be supported by all major browsers nowadays. Here's an example:
<!DOCTYPE html>
<html>
<head>
  <title>SVG Example</title>
</head>
<body>
  <svg width="100" height="100">
    <circle cx="50" cy="50" r="40" fill="red" />
  </svg>
</body>
</html>
This is called inline because it is created directly inside of the HTML code. In this manner I can even show you the red circle by adding this tag in the HTML of this post:
Using an iFrame
Another method would be by passing the SVG wrapped as an HTML document into an iFrame using the srcdoc attribute:
<!DOCTYPE html>
<html>
<head>
  <title>SVG Example</title>
</head>
<body>
  <h1>SVG Example</h1>
  <iframe srcdoc=
    "
    <!DOCTYPE html>
    <html>
      <head>
        <title>SVG Document</title>
      </head>
      <body>
        <svg width='100%' height='200'>
          <rect x='33%' y='50' width='100' height='100' fill='red'/>
          <circle cx='66%' cy='100' r='50' fill='blue' />
        </svg>
      </body>
    </html>
    " width="200" height="200"></iframe>
</body>
</html>
Tip: you can also specify percentages as coordinates, which will be relative to the size of the viewport. In this case I set the viewport to 100% such that it fills out the entire width of the text column it's in:
Using the img/object tags
If your HTML can access external files then you can simply create your SVG in a vector graphic software and save it as it's own file with the .svg extension. To get it inside your HTML you can then use the <img> and <object> tags:
<img src="image.jpg" alt="alt text goes here">
The <img> and <object> tags are both HTML elements used to display images on web pages, but they work in slightly different ways. The <img> tag is used to embed static image files and is simple to use and efficient, but it does not support interactive features or scripting.
The <object> tag on the other hand is more flexible and can be used to embed a wide range of media types, including images, videos, and other HTML documents. It supports interactive features and scripting and allows you to specify fallback content if the media file cannot be loaded or if the user's browser does not support the media type.
<object data="image.svg" type="image/svg+xml">
  <img src="fallback-image.jpg" alt="alt text goes here">
</object>
As CSS background
We can also create an SVG by passing it in css as background-image:
.element {
  background-image: url('data:image/svg+xml;utf8,<svg xmlns="http://www.w3.org/2000/svg" viewBox="0 0 100% 200"><circle x="50%" y="100" r="50" fill="red"/></svg>');
}
Alternatively you don't have to pass in the entire svg, but can link to a file as well:
.element {
  background-image: url('path/to/your/svg/file.svg');
}
Converting other image formats to SVG
There are some methods to convert PNGs, JPEGs and other raster based formats to the SVG format. However, they are a little backhanded, and very often end up not being not very accurate.
Trying to convert a complex graphic, such as a photograph, into a vector graphic, defies the purpose of the SVG format. Fine details, textures and gradients can not be easily represented with SVGs, and if we tried to do so, we'd end up with an incredibly bloated SVG code.
Some vector editing softwares provide this kind of conversion already like Adobe Illustrator and Photoshop; you can try it for yourself in Adobe's online converter (you need to create an account however).
Creating SVGs with Javascript
Earlier we've had a look at a couple of different methods to inject SVGs into our HTML page. Now, what if we don't have the SVG yet when we run the page? Or we don't want to write this SVG code manually? What if we wanted to create the SVG dynamically and in a generative manner?
One solution for this would be by using Javascript!
I recently asked a couple of Twitter friends about their strategies for this problem. Ismalhelio says:
I just create everything from scratch using js. Create an svg object and add the properties, groups, geometry… i do that in order to be able to plot the output the way I want. With layers and all that
Hence, one method to creating an exportable SVG version of the sketch would be by mirroring the rendering context's drawing functions, and simultaneously appending elements to an SVG.
The plotter master and gen-art OG Julien Gachadoat does exactly this.
Pathways (0,0) pic.twitter.com/RgheFuGrds
— Julien Gachadoat (@v3ga) April 6, 2023
He chimed in and provided me with a complete example as well! Essentially, he creates his own SVG renderer that has analogous functions to the p5 drawing functions, which he invokes whenever he draws something to the canvas:
// In the setup
rendererP5 = new RendererP5(width,height,{canvas:c});
rendererSVG = new RendererSVG(width,height);

rendererP5.begin("my-p5");
rendererSVG.begin("my-svg");

// ... other stuff ...

// When drawing the graphics
rendererP5.line(x1,y1,x2,y2);
rendererSVG.line(x1,y1,x2,y2);
There's a little bit of setup that we've got to do first to get something like this working.
Creating the SVG Element
The key function here is the document.createElementNS() function. Similarly to the document.createElement() function, that you might already be familiar with, and which can be used to create an element in your HTML document, the function createElementNS() allows us to create a new element with a specified namespace (hence the letters NS).


We mentioned namespaces earlier, but what are they? And why do we need one to create SVGs?
Namespaces are used to group related code elements under a single name, usually this helps with organizing code, and in the case of XML and HTML it allows the two tag vocabularies to coexist without the occurrence of naming conflicts. In other words, the namespace helps the browser distinguish between the SVG tags and the HTML tags.
Julien's code is very elaborate and specifically made for larger projects, hence let's put together a minimal example using his ideas as starting point. We can create the SVG element as follows:
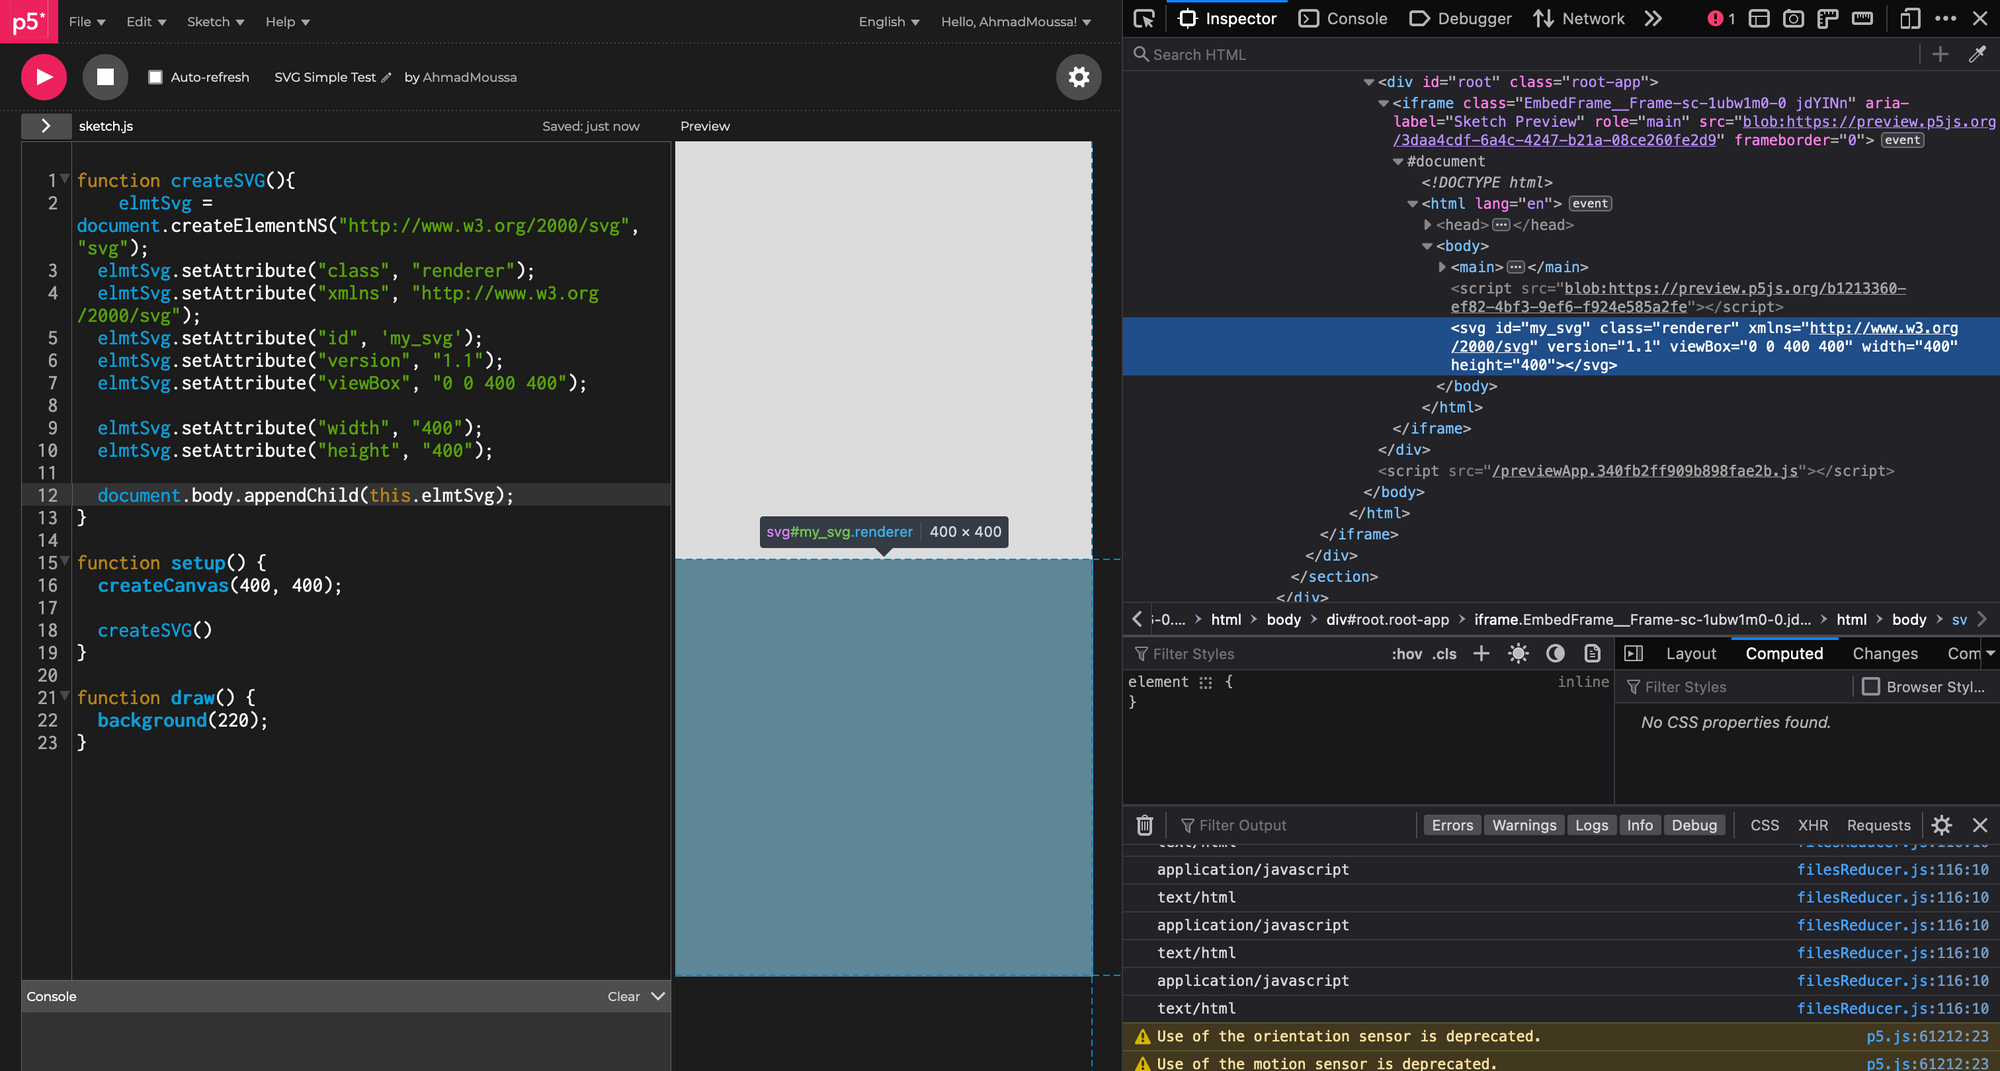
elmtSvg = document.createElementNS("http://www.w3.org/2000/svg", "svg");

elmtSvg.setAttribute("class", "renderer");
elmtSvg.setAttribute("xmlns", "http://www.w3.org/2000/svg");
elmtSvg.setAttribute("id", 'my_svg');
elmtSvg.setAttribute("version", "1.1");
elmtSvg.setAttribute("viewBox", "0 0 400 400");
elmtSvg.setAttribute("width", "400");
elmtSvg.setAttribute("height", "400");

document.body.appendChild(this.elmtSvg);
Here we create the svg element and store it inside a variable called elmtSvg and then via the setAttribute method that exists in JS out of the box, we set the required attributes. There's quite a bunch of them, but we only need to do this once.
The SVG namespace is essentially a URI:
The SVG namespace is represented as a Uniform Resource Identifier (URI) because it is a globally unique identifier that is used to identify the namespace and distinguish it from other namespaces. URIs are used to uniquely identify resources on the web and can be thought of as addresses for those resources.
In the case of SVG, the URI identifies the XML namespace used by the SVG specification. This allows for SVG elements and attributes to be correctly interpreted and rendered by web browsers and other software that supports the SVG standard. By using a URI as the namespace identifier, the SVG specification ensures that there is no confusion with other XML namespaces that may be used in a given document or application.
And in this manner we would already have created an SVG element, even though we can't see it yet, because it's empty. If we inspect the HTML of our sketch however, we will see that it is there:
Drawing to the SVG
The next step would be to actually draw to the SVG. In this context, when we say draw to the SVG, we actually mean that we will create new elements and append them to the body of the SVG element that we created earlier.
It's easiest to explain this by showing an example:
function drawSVGLine(elemtSvg, x1,y1,x2,y2){
  line = document.createElementNS("http://www.w3.org/2000/svg", "line");
  line.setAttribute("x1",x1);
  line.setAttribute("y1",y1);
  line.setAttribute("x2",x2);
  line.setAttribute("y2",y2);

  elemtSvg.appendChild(line)
}
For convenience we'll wrap this code inside a function such that we can invoke it as many times as we want. Therefore, drawing a line for instance, boils down to the same steps we did before:
- Creating the line element with the name-spaced createElementNS() function, passing along the SVG namespace URI.
- Setting the required attributes. In the case of a line it is the coordinates of the end-points.
- And lastly we have to append this new element to the SVG that we created before.
Now if we were to run this we wouldn't actually see a line, because we didn't set a stroke color. It would be transparent just like the background of our svg element.
We can fix this by setting the stroke attribute to a specific color before appending:
lineSvg.setAttribute("stroke", "#000000");
And that should do the trick! There's many shapes, that are supported by the SVG format; I recommend this resource as starting point to learn more:
Creating your own Renderer
With this you should be equipped with enough information to put together your own little renderer that can construct SVGs in a manner that suits your needs. Julien's renderer is very elaborate and supports most if not all possible shapes that you can also create with P5.
And the way that it's done is pretty neat; the renderer is actually it's own class with several helper functions that aim to reduce redundancies. For instance, we have a multi purpose appending function that takes as input an arbitrary element and appends it to the body of the main SVG:
drawElmt(svgElmt){
  this.elmtDraw.appendChild(svgElmt);
}
Then whenever a particular element is created we can invoke this function to append it. There's also functions that handle groupings as well as nested groupings of SVG elements by keeping track of them within a stack-like array.
If you want to learn more about SVG groups, there's this really cool resource on the topic by Sara Soueidan:
Saving the SVG
To export the SVG we make use of the Blob object in javascript. Following Julien's manner of doing this:
svgEl.setAttribute("xmlns", "http://www.w3.org/2000/svg");
var svgData = svgEl.outerHTML;
var preface = '<?xml version="1.0" standalone="no"?>\r\n';
var svgBlob = new Blob([preface, svgData], {type:"image/svg+xml;charset=utf-8"});
Since we created our SVG via the html <svg> tag, we need to go through some extra steps to bundle it up as a standalone SVG element. For this purpose we need to set the xmlns attribute of the outermost root <svg> tag. This is to specify that the document is in fact an SVG.
Next we want to get the entire tag by fetching it through the outerHTML property, which in contrast to the innerHTML property, that is probably more commonly used, returns the body of an HTML element in addition to the tag of the element itself.
We can use the Blob object to get our SVG out of JavaScript. This object is like a container that can hold different data types, including our SVG. To create a Blob object that holds our SVG, we need to use the Blob constructor and give it an array of data that includes the <?xml> tag, the SVG code itself, and specify that the data in the blob is an SVG. This way, we can save the SVG code as a file.
And finally to download the SVG:
var svgUrl = window.URL.createObjectURL(svgBlob);
var downloadLink = document.createElement("a");
downloadLink.href = svgUrl;
downloadLink.download = name;
document.body.appendChild(downloadLink);
downloadLink.click();
document.body.removeChild(downloadLink);
We create a virtual download link, point it to the blob object, momentarily append this download link to the page, then simulate a click on this link to make the browser download the SVG and then detach the link from the page again. Neat, right? You'll probably want to trigger this code when a specific button is pressed, which can be done with an event listener or the keyPressed() function that comes with P5 out of the box.
Here's an example of all that we've discussed so far:
Converting SVGs to Canvas Elements
One final thing that we might want to do with our SVG, is to convert it into a canvas element with varying resolutions. For this Julien had a nice link as a comment in his code, point to:
You can check out the post for the details, but essentially it boils down to encoding the SVG as image data with the encodeURIComponent() function and then setting it as the src attribute of an img that gets rendered to our canvas:
// 1. Fetching the rendering context of the canvas we want to draw to
let canvas = document.getElementById('myOutputCanvas');
let ctx = canvas.getContext("2d");

// 2. Creating an Image
let img = new Image();

// 3. Rending this image in the canvas
img.onload = function() {
	ctx.drawImage(img, 0, 0, ctx.canvas.width, ctx.canvas.height);
}

// 4. Setting the source of the image to our SVG as encoded Data URL
img.src = "data:image/svg+xml;charset=utf-8,"+encodeURIComponent(`<?xml version="1.0" standalone="no"?>\r\n${svg.outerHTML}`);
The width and height of this canvas will determine the dimensions of the SVG. P5 provides a useful createGraphics() function to create an offscreen canvas which you could use for this purpose. I wrote a bit more about this graphics buffer element here:
Closing Thoughts
And that's about it! If you end up putting together your own little set of functions to export SVGs and find something interesting let me know. An interesting additional thing in Julien's code is that it also supports p5 push() and pop() like operations as well as the translate() and rotate() functions via matrix operations. I might cover them in a future post!
Another resource that I want to point out here is SVGKit, which is a library that can mirror rendering context operations and outputs SVGs, I haven't tried it myself yet but it seems like a viable alternative if you don't want to write your custom code:
Thanks for reading! Cheers and happy coding!