This is an outdated post, please visit the newer version here:
Over two years ago, I saw Andrew Huang's video on creating music from a video of fireworks. He used a software that essentially took the pixel values of a video and converted them to midi signals that were sent to his modular synth. Since I had no modular synth (and I still don't have one), but had Ableton Live, I wanted to build somthing similar. However I had no idea how to send external triggers to Ableton or how it could receive them. I honestly didn't know where to begin with, and info on this seemed very sparse on the internet. But after a little digging I was able to piece together all the components that I needed. After that I created a github repository that guides one through the necessary steps to have a python script trigger a synth in Ableton. Which is to date my most starred github repository. It's only appropriate that I revisit it and write a more detailed blog post about it. Let's get started!
Requirements
- Obviously you need to have python installed on your pc/laptop.
- After verifiying that you have python installed correctly on your machine, install this package via pip:
!pip install python-rtmidi - Install this software: LoopMIDI by Tobias Erichsen
- And naturally you'll also need Ableton Live installed on your device.
Setup
Why do I need to install rtmidi and LoopMIDI?
rtmidi is a python package that makes it easy to create a MIDI signal with a couple of lines of code in a python script, whereas LoopMIDI allows us to create a virtual port. Both are essential for us to be able to send the MIDI signal to Ableton. We will configure ableton in such a way that it is going to listen to the virtual port, whereas the python script will create and send MIDI signals to that port.
Creating a port with LoopMIDI
Creating a new port with LoopMIDI is as simple as running the executable and then clicking on the small + button in the lower left corner. You'll see a new entry pop up in the list of ports. Voila, we have created a port!
The python script
Create an empty python file somewhere in a directory on your pc. Copy the following content into it:
# import time and rtmidi package
import time
import rtmidi
the function call rtmidi.Midiout() creates the handler that we'll use to send midi signals
midiout = rtmidi.MidiOut()
check and get the ports which are open
available_ports = midiout.get_ports()
here we're printing the ports to check that we see the one that loopMidi created.
In the list we should see a port called "loopMIDI port".
print(available_ports)
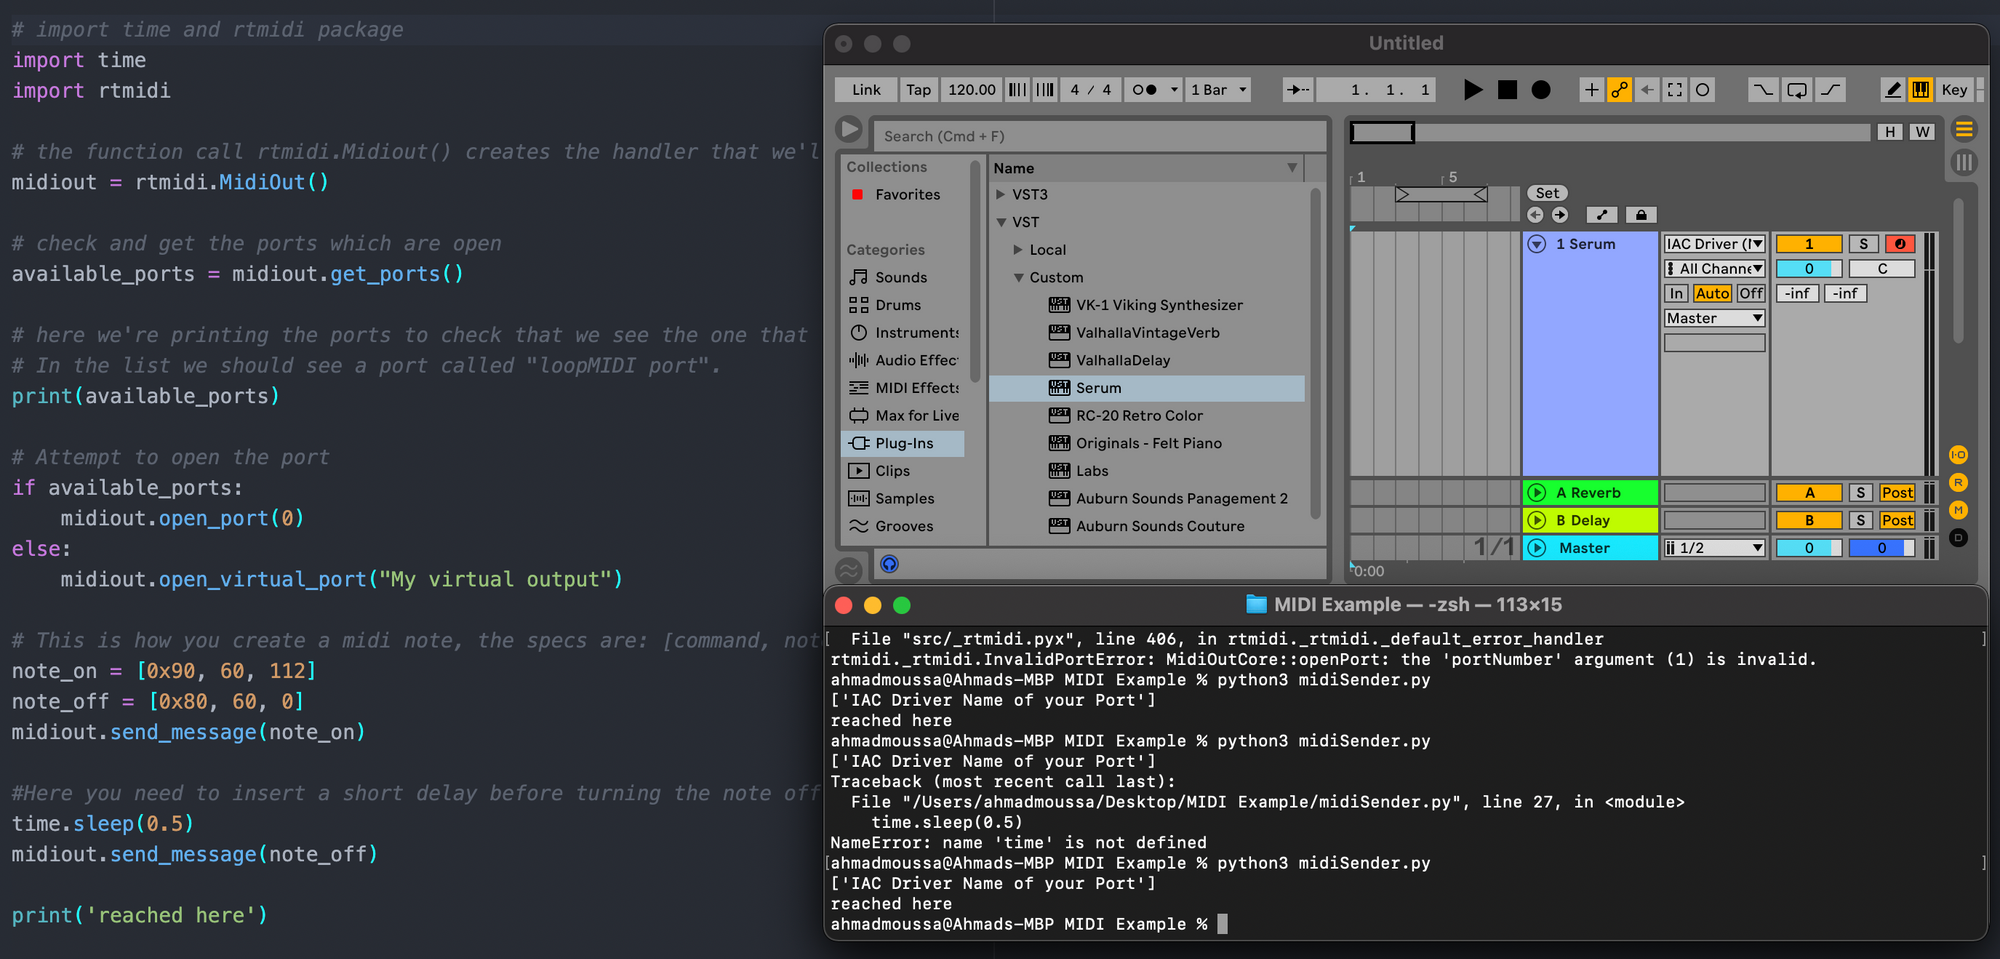
Attempt to open the port
if available_ports:
midiout.open_port(1)
else:
midiout.open_virtual_port("My virtual output")
this is how you create a midi note, the specs are: [command, note, velocity]
note_on = [0x90, 60, 112]
note_off = [0x80, 60, 0]
midiout.send_message(note_on)
Here you need to insert a short delay before turning the note off to make sure that the note_on signal was received
time.sleep(0.5)
midiout.send_message(note_off)
There's a number of things happening in this short piece of code. First we are importing the rtmidi package that we installed with pip as well as the time module from python, we'll need it in a bit. Next we invoke check which ports exist on our device at the moment of execution and print a list of them. There should be two, one default port that already exists on our system as well as the LoopMIDI port that we created.
But what are MIDI signals exactly?
If you got this far, great! Now we need to create the midi note that we will send to the port. MIDI signals are essntially a set of commands that can be created following certain specifications. More formally a midi command consists of a series of numbers that indicate a certain instruction that will be executed when received by a MIDI device. rtmidi allows us to create such a command simply by creating an array consisting of three values. The first being the event type, here we wrote 0x90 indicating a 'note on' event. The second value indicates the pitch of the note. MIDI notes span from 0 to 127, where a value of 60 would indicate a middle C note. And lastly, we indicate the velocity of the note, which is essentially the intensity with which we are playing the note. Analogically, velocity can be portrayed by how hard you're pressing down on a piano key. On the following line of code you can see another set of values, indicating the 'note off' event, which we will need to turn indicate that we are done playing the middle C note that we just sent over the port. Notice that here we indicate a velocity of 0.
After creating both 'note on' and 'note off' events we can proceed to sending the notes over to the port. This is simply done by invoking the handler and using the send_message() function, where we pass the 'note on' message. If you switch to the LoopMIDI window you'll see that the value in the 'Total Data' column for the respective port will have increased, which means that the note has been received.
Configuring Ableton
In Ableton we'll have to do click a couple of buttons. First jump to your preferences and go to Link MIDI. In the 'MIDI ports' section you should see a entry called 'Loop MIDI' port under inputs. Click on the 'on' button under the 'track' column.

After that create a MIDI track and make sure it has an instrument loaded. Next you'll want to arm the track, set it to auto and set the 'MIDI from' field to the 'Loop MIDI' port. Now run the script, and voila it should have trigerred the midi note.
MIDI signals from Python to Ableton Live
Sending MIDI signals from an external python script to Ableton is easy but requires a little bit of setup, which I'll guide you through in this blog post.