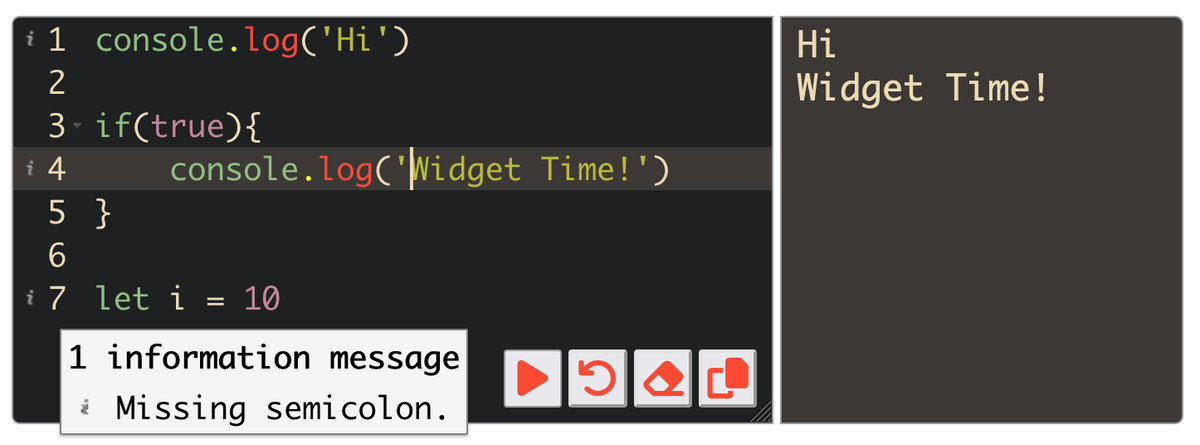
In this tutorial we'll build this little widget:
A couple of days ago, I was working on a new post, where I thought that it would be nice to have a little sandbox widget, in which I could showcase the different examples that occur throughout the text. Essentially I wanted the reader to be able to run the Javascript snippets, and have the option to edit these snippet and re-run them.
I started looking for existing tools that could do something like that. But either I'm dumb and I've lost all ability to google anything, or there aren't really any widgets that do exactly this.
The one that I found, that was the closest to what I had in mind was Runno. It's actually really cool, supports a couple of different run-times, and would have been what my widget of choice if I didn't end up making my own.
Another option obviously would have been codepen and jsFiddle, and somehow overwrite the HTML page with the console's output. But that was a bit too clunky, and I didn't want to clog up my page with external embeds that bump up the page load overhead.
A widget that I really like, is the p5 widget by toolness, that I've used on several occasions in my tutorials. It simply lets me drop in a script tag in the markdown editor, and it automatically replaces itself with the editor + canvas widget at the script location. I wanted something like that, but with a console instead of the p5 canvas! Building something like that can't be too difficult, right? Well, let's get to it!
To build a JS Sandbox
Besides Codepen and jsFiddle, that are mainly geared towards showcasing interesting things that can be done with html, css and javascript, there's also platforms like codeacademy, freecodecamp, udemy and coursera, all of which have a hands on approach to teach programming, completely contained within the browser. This is done via an interface that asks the user to solve code problems to advance through the lessons.
Then we also have more specific pages - that you might already be familiar with if you've read more than just this post on the blog - such as openprocessing and the p5 editor page, that let you run p5 code and display sketches inside an accompanying canvas.
To begin, it's probably a good idea to understand how websites like the aforementioned ones allow the execution of Javascript code written by the user before we attempt to build our own simple little widget that can to some degree achieve the same.
After googling for a while, I came across this incredibly helpful post by Mike West that elucidates some of the security concerns, that you need to keep in mind when allowing the user to run Javascript code on your website. Besides that it also shows how to create your a sandboxed environment in which Javascript code can be safely run. This post will serve as the foundation for our widget.
I also found two other resources on the topic, but I didn't hark further into them because the two of them use react and babel, which I have no experience with. The first one is by Krasimir Tsonev and shows how to build an interactive javascript playground and another blog post by Matija aka Joy of Code that also shows how to do this.
My goal was to make something purely with javascript, that behaves like the p5 widget from toolness and that can be easily hosted as a file on github.
I wanted my widget to work the same that th p5 widget did. It's incredibly simple, you just drop a script tag in your post's html/markdown file. Then whatever p5 code exists inside this script tag will be shown in the widget's editor pane and become runnable with a button. In my case, instead of the canvas, I wanted there to be a console that shows the output of the js code in the editor pane when it's executed.
In retrospect, I could have saved myself a lot of time by searching for terms like 'build a javascript sandbox' and/or 'make a javascript playground'. My initial search queries were something along the lines of 'embeddable javascript console' which also leads to interesting threads, but doesn't exactly satisfy what I'm looking for.
Although, I did come across a useful SO answer detailing a function that I ended up using. It shows how one can 'monkey patch' the console output into an html div. It'll come in hangy for simulating the console in our widget. Ultimately, the widget ended up being a patchwork of code from different sources.
The evil eval() and sandboxed iFrames
I had a gander at the aforementioned pages' html code, a commonality between is that the div - where the result of the code is shown - is generally wrapped inside of an iFrame element.
That's odd... why use an iframe? I thought that I could just use the convenient eval() function in javascript, run the user's code snippet and then send the result of the snippet to be displayed in a simulated div console.
TIL the eval() method is problematic for a couple of reasons, and poses a big security risk when run server side. For instance, imagine you're prompting a new user to enter their username and instead of doing so, a bad actor decides to craft a malicious string that is actually an infinite loop in disguise. If this username ends up being evaluated, it would potentially lead to the entire server crashing.
Well... then how do all of those websites happily run user submitted code when it's actually a bad idea to use the eval() function?
iFrames! This security issue can be circumvented by using an iFrame with the sandbox attribute! The sandbox attribute creates a restricted and contained environment for the user's code to run in. This is where the post by Mike West comes into play, where he explains the purpose of sandboxed iframes:
We're as secure as we can be if we follow the principle of least privilege, and block each and every feature that isn't directly relevant to functionality we'd like to use. The result is that we no longer have to blindly trust that some piece of embedded content won't take advantage of privileges it shouldn't be using. It simply won't have access to the functionality in the first place.
Alright, so an iFrame with the sandbox attribute it is!
One problem remains however, one that we can't really do anything about. Users are still capable of submitting code that could potentially run infinitely, wether it's done on purpose or by accident, there isn't really anything that we can do against it. There is no way of verifying if a loop will stop or not, it is in fact an NP hard problem. Well, it's gonna make the user's window freeze and they'll have to force quit it.
Alright, I think we've done sufficient prep work, and it's time to get started with actually building our widget.
The HTML skeleton & preliminary CSS
Let's begin with the basic components of our widget. We need three things, an element into which we can type, an element that will display the console output of the evaluated javascript code, and a button that connects the two and sends a message between the editable area and the simulated console area.
HTML has useful tag for the purpose of inputting characters called textarea, and for display the result we'll use an iFrame. Our HTML skeleton would thus look something like this:
<div>
  <div>
    <textarea></textarea>
    <button>Run</button>
  </div>
  <iframe></iframe>
</div>
Not much to see here yet. There is an iFrame but since it has no content it's gonna be blank for now. Let's first add a little bit of style to make this look just a little bit better:
.widgetContainer {
  display: flex;
  flex-direction: row;
}

.buttonAndInput {
  display: flex;
  flex-direction: column;
}

.logFrame {
  border:1px solid #999999; margin:2px; padding:3px;
  flex: 1 0;
}

.textArea{
  border:1px solid #999999; margin:2px; padding:3px;
  flex: 1 0;
  resize: horizontal;
}

.runButton{
  border:1px solid #999999; margin:2px; padding:3px;
}
The HTML with the class attributes:
<!DOCTYPE html>
<html>
  <head>
    <style> <!-- add style here --> </style>
  </head>
  <body>
    <div class="widgetContainer">
      <div class="buttonAndInput">
        <textarea id='code' class='textArea' ></textarea>
        <button id='safe' class='runButton'>Run</button>
      </div>
      <iframe class='logFrame'></iframe>
      <script>
  		<!-- code that sends the message -->
      </script>
    </div>
  </body>
</html>
We'll make the container a horizontal flexbox, and additionally we'll group the button and the textarea together inside a div that's a vertical flexbox. This would now look as follows:
And now we also need a file that structures the iFrame's content:
<!-- frame.html -->
<!DOCTYPE html>
<html>
    <head>
    <title>Evalbox's Frame</title>
    <div id='log'></div>
    <script>
  		<!-- code that catches the message -->
    </script>
    </head>
</html>
There's also script tags in both files that we'll need to make the main window communicate with the iFrame.
Communicating with the iFrame
We'll need to write a little bit of Javascript and add an eventListener that detects if the button was pressed, so that we can send the content of the textarea over to the iFrame:
function evaluate() {
  var frame = document.getElementById('sandboxed');
  var code = document.getElementById('code').value;

  frame.contentWindow.postMessage(code, '*');
}

document.getElementById('safe').addEventListener('click', evaluate);
The evaluate() function simply fetches the iFrame and textarea elements from the DOM by their ids, gets the value of the textarea, and then sends it over to the iFrame with the convenient postMessage() function that allows cross origin communication between the the two windows.
We add this function as a triggerable event to the button when it's clicked. In Mike West's tutorial, he also covers the case where the iFrame sends back an alert to the main window, but we don't need that for our purposes.
In the iFrame's script tag we need also need to add some Javascript code to receive the message from the main window:
window.addEventListener('message', function (e) {
  var mainWindow = e.source;
  try {
    eval(e.data);
  } catch (e) {
    console.log('eval() threw an exception.');
  }
});
We attach an event listener to the iFrame that triggers whenever it receives a message. This message containing the code that the user has written inside of the textarea, it should then be evaluated with the eval() method. We also wrap this eval() inside of a try and catch block to except errors.
Ultimately how you want the iFrame to behave is entirely up to you, but for my purposes I only want it to really do anything when the user makes use of the console.log() command.
There's some more Javascript that we need to add here, which additionally outputs the evaluated result to our pretend console, which is the div with id log in our iFrame. We can do this with the monkey-patch code from this SO answer, that overwrites the effect of the console.log function:
(function () {
  var old = console.log;
  var logger = document.getElementById('log');
  console.log = function (message) {
  if (typeof message == 'object') {
    logger.innerHTML += (JSON && JSON.stringify ? JSON.stringify(message) : message) + '<br />';
  } else {
    logger.innerHTML += message + '<br />';
  }
}
})();
Putting all of this together we get something that works like this:
And this is basically already it if you're just looking for a simple editor+console. But there's a couple more things that we need to think about before this can be shipped as a widget.
Ace Code Editor
Writing code in the bland text area doesn't look very appealing. We'd much rather have it styled, and have the editable area also notify us of potential errors that the user might have entered.
Another look at the HTML code of the editor panes/divs aforementioned websites, we can see that the majority of them make use of codeMirror, such as codepen, jsFiddle, openprocessing and the p5 editor, whereas the educative platforms like codeacademy and freecodecamp make use of Monaco. Both Code Mirror and Monaco are tools that can turn a textarea into full fledged code editors running in the browser.
There's a third one, namely the ace editor, which I ultimately ended up using (for no particular reason). To make it happen I found this post that provided the secret sauce.
Essentially, we first need to import the ace editor's JS that will power the editor pane:
<script src="//unpkg.com/ace-builds/src-min-noconflict/ace.js">Then we replace the textarea with a pre tag:
<pre id='code' class='textArea editor'>console.log('hi')</pre>And we also need to add some JS to initialize the editor:
const editorEl = document.querySelector('.editor');
const editor = window.ace.edit(editorEl);
editor.setTheme(`ace/theme/gruvbox`);
editor.session.setMode(`ace/mode/javascript`);
There's a bunch of options that we can set here, and are up to your preference.
Bundling a Single Script
Alright, so we've come pretty far, but now we've got two html files and a stylesheet. How do we combine all of the above within a single javascript file?
Here I came across this SO answer that explains how to create a widget factory, that we can use to generate and inject all of the code that we've written so far as a compact widget on the page.
Doing it in this manner also achieves the exact functionality that I have described earlier, where we simply drop in a script tag into our HTML and it'll replace itself with the widget at that location. The way that we're going to do this is however a little bit backhanded.
Here's the entire code of the widget, commented and with the strings redacted:
(function createWidget() {
  /* Create the widget as an object */
  const Widget = Object.create({

    /* We need an id to identify unique widgets on the page,
     if there are multiple widgets on the same page */
    create(id) {
      const style = `` /* add style information as string here */

      /*
        This fetches the content of the script tag in the html
        we'll inject it into the editor
      */
      snippet = document.currentScript.innerHTML

      /* Create the div that will contain the widget */
      const wdg = document.createElement("div");
      wdg.innerHTML = ``; /* create the html of the widget as string EXCEPT THE JAVASCRIPT */

      /*
        We need to attach the javascript separately otherwise it won't run
      */
      wdg.script = document.createElement("script")
      wdg.script.setAttribute('type', 'text/javascript');
      wdg.script.appendChild(document.createTextNode(`` /* Javascript code goes here, also as a string */))

      /* Attach the script tag */
      wdg.appendChild(wdg.script)

      /* return the entire widget element */
      return wdg;
    }
  });

  /* Generate a random number to be used as ID */
  const id = `js${ Math.floor((1 + Math.random()) * 0x10000).toString(16).substring(1) }`;

  /* Create the Widget */
  const myWidgetInstance = Widget.create(id);

  /* Use the document.write() function to insert a new div and attach the generated widget */
  document.write(`<div id= ${ id } ></div>`);
  document.getElementById(id).appendChild(myWidgetInstance);

  /* Now we also need to tell the iFrame element what it should do
  which can be done by setting it's srcdoc attribute with the html as string  */
  let ifr = document.getElementById(`sandboxed-${ id }`)
  ifr.srcdoc = `` /* iframe html goes here as string */
})();
In essence we're using an anonymous function that gets triggered when we insert a script tag that references this code as src file. The function then gets executed and creates a new html element that will be inserted into the DOM. Using Javascript we need to generate the html, css and javascript that powers the widget, which can be done by creating the code a strings and adding them to the created div.
Manipulating html and javascript code as strings is a bit of a conundrum, as there will be a lot of characters that need to be escaped, and we will also struggle with line breaks. Using regular single or double quotation marks makes truly makes this a nightmare.
Our hero in this case, is a feature introduced in ES6, namely the backticks! Similarly to single and double quotation marks they can be used to create strings, however with the additional benefit of allowing multiline strings, alleviating the need to escape symbols and providing template literals with which we can inject symbols easily.
Here's a little example of how we would add the html code of the div using backticks:
const wdg = document.createElement("div");
wdg.innerHTML = `
  <head>
    <style>${ style }</style>
  </head>
  <body>
    <div class="widgetContainer${ id }">
      <div class='buttonAndInput${ id }'>
      /* etc */
      </div>
    </div>
  </body>
`
We create the entire html content as a backtick enclosed string, where we don't have to escape single or double quotation marks, and can inject symbols with tempalte literals. For example, we'll create the style sheet separately and inject with the template literal notation. We can also inject widget instance specific class attributes that have an id number attached. This id is necessary to avoid conflicts if we inject multiple instances of the widget on the same page.
There's also a couple of problems that arise from generating our widget in this manner. If you had a look at the commented code you'll notice that we attach the js code of the widget separately and have to create the iframe in an additional step, this is due to:
- Adding a script tag as innerHTML will make this script to not function. We need to add it afterwards as a text node and explicitely specify that it is a script.
- Similarly adding the iFrame we need to find a workaround to add it's html code since we can't load in a file through the
srcattribute. Secondly we can't access the interior of this iFrame and set it manually due to CSP. The solution to this is passing the html of the iframe through thesrcdocattribute.
SEO Optimizations
If we embed our widget now and then give lighthouse a little spin, we'll notice that it'll complain about a couple of things, mainly accessibility related issues. While we're still at it we can fix these as well!
- Lighthouse will complain that buttons don't have a name, this can be fixed by adding the `aria-label` attribute to the buttons in the widget.
- It'll also complain that the textarea of the ace editor has no label. Since the ace editor creates this textarea after being initialized, we need to manually add a label in post, and link their ids. I did it as follows:
let lbl = document.createElement('label')
lbl.innerHTML = 'Editor Pane'
lbl.setAttribute('for', 'aceTI${ id }')
lbl.setAttribute('class', 'visuallyhidden')
editorEl${ id }.appendChild(lbl)

let aceTI = document.getElementsByClassName('ace_text-input')[0]
aceTI.id = 'aceTI${ id }'- Lighthouse will also complain about iframes without a title attribute, so simply add a descriptive title to the iframe.
Let me know if there is anything else that should be added.
Complete Widget Code
Here's the complete code of the widget, at least the final version at the time of writing this. It's turned out a bit lengthy after all:
(function createWidget() {
  const Widget = Object.create({
    create(id) {
      const style = `
        .logFrame${ id } {
          border-left: 2px solid #fb4934;
          border-top: 0;
          border-right: 0;
          border-bottom: 0;
          margin: 2px 2px 2px 0;
          font-size: 14pt;
          border-radius: 0 .5rem .5rem 0;
          flex: 1 0;
          overflow: hidden;
          background: #3c3836;
        }

        .textArea${ id } {
          margin: 2px 0 2px 2px;
          padding: 3px;
          font-size: 14pt;
          border-radius: .5rem 0 0 .5rem;
          flex: 1 0;
          resize: horizontal;
          min-width: 300px;
          max-width: 600px;
        }

        .widgetContainer${ id } {
          display: flex;
          flex-direction: row;
          justify-content: space-between;
          overflow: hidden;
          min-height: 250px;
        }

        .buttonAndInput${ id } {
          display: flex;
          flex-direction: column;
          position: relative;
        }

        .buttonList${ id } {
          bottom: 0;
          right: 0;
          margin: 10px;
          position: absolute;
          display: flex;
          min-height: 35px;
        }

        .runButton${ id } {
          flex: 1 1 100%;
          margin: 2px;
          padding: 2px;
          border-radius: .2rem;
          min-width: 35px;
          min-height: 35px;
          color: #fb4934;
        }

        .undoButton${ id } {
          flex: 1 1 100%;
          margin: 2px;
          padding: 2px;
          border-radius: .2rem;
          min-width: 35px;
          min-height: 35px;
          color: #fb4934;
        }

        .clearButton${ id } {
          flex: 1 1 100%;
          margin: 2px;
          padding: 2px;
          border-radius: .2rem;
          min-width: 35px;
          min-height: 35px;
          color: #fb4934;
        }

        .copyButton${ id } {
          flex: 1 1 100%;
          margin: 2px;
          padding: 2px;
          border-radius: .2rem;
          min-width: 35px;
          min-height: 35px;
          color: #fb4934;
        }

        .buttonText${ id }{
          font_size: 0pt;
        }

        .fa-shake-hover${ id }:hover {
          -webkit-animation: fa-shake 2s infinite linear;
          -moz-animation: fa-shake 2s infinite linear;
          -o-animation: fa-shake 2s infinite linear;
          animation: fa-shake 2s infinite linear;
        }
      `
      snippet = document.currentScript.innerHTML

      const wdg = document.createElement("div");
      wdg.innerHTML = `
        <head>
          <title>Ace Editor Pane</title>
          <meta name="description" content="A simple minimal code editor">
          <style>${ style }</style>
        </head>

        <div class=\"widgetContainer${ id }\">
          <div class=\'buttonAndInput${ id }\'>
            <pre id=\'code-${ id }\' class=\'textArea${ id } editor${ id }\' aria-label=\'code editor\'>${ snippet }</pre>
            <div id='buttons${ id }' class='buttonList${ id }'>
              <button id=\'run-${ id }\' class=\'runButton${ id } fa-solid fa-play fa-shake-hover${ id } fa-lg\' aria-label="Run"></button>
              <button id=\'undo-${ id }\' class=\'undoButton${ id } fa-solid fa-undo fa-shake-hover${ id } fa-lg\' aria-label="Undo"></button>
              <button id=\'clear-${ id }\' class=\'clearButton${ id } fa-solid fa-eraser fa-shake-hover${ id } fa-lg\' aria-label="Clear"></button>
              <button id=\'copy-${ id }\' class=\'copyButton${ id } fa-solid fa-copy fa-shake-hover${ id } fa-lg\' aria-label="Copy"></button>
            </div>
          </div>
          <iframe sandbox=\'allow-scripts\' id=\'sandboxed-${ id }\' class=\'logFrame${ id }\'></iframe>
        </div>
      `;


      wdg.script = document.createElement("script")
      wdg.script.setAttribute('type', 'text/javascript');

      wdg.script.appendChild(
        document.createTextNode(
          `
          let editorEl${ id } = document.getElementById(\"code-${ id }\"),
          editor${ id } = window.ace.edit(editorEl${ id });

          editor${ id }.setTheme(\"ace/theme/gruvbox\"),
          editor${ id }.setOptions({fontSize: \"14pt\"});
          editor${ id }.session.setMode(\"ace/mode/javascript\"),
          editor${ id }.renderer.setScrollMargin(10, 10);

          editor${ id }.on(\"change\",
            e => {console.log(\"edited result\",e)}
          );

          function evaluate(){
            var e = document.getElementById(\"sandboxed-${ id }\");
            t = editor${ id }.getValue();

            e.contentWindow.postMessage(t,\"*\")
          }

          window.addEventListener(\"message\",
            function(e){
              var t=document.getElementById(\"sandboxed-${ id }\");
              \"null\"===e.origin&&e.source===t.contentWindow&&alert(\"Result: \"+e.data)
            }
          ),

          document.getElementById(\"run-${ id }\").addEventListener(\"click\", evaluate);

          function undo(){
            editor${ id }.session.getUndoManager().undo();
          }

          document.getElementById(\"undo-${ id }\").addEventListener(\"click\", undo);

          function clear(){
            editor${ id }.session.setValue('');
          }

          document.getElementById(\"clear-${ id }\").addEventListener(\"click\", clear);

          // https://stackoverflow.com/a/33928558/6688750
          function copyToClipboard(text) {
              console.log(text)
              if (window.clipboardData && window.clipboardData.setData) {
                  // Internet Explorer-specific code path to prevent textarea being shown while dialog is visible.
                  return window.clipboardData.setData("Text", text);

              }
              else if (document.queryCommandSupported && document.queryCommandSupported("copy")) {
                  var textarea = document.createElement("textarea");
                  textarea.textContent = text;
                  textarea.style.position = "fixed";  // Prevent scrolling to bottom of page in Microsoft Edge.
                  document.body.appendChild(textarea);
                  textarea.select();
                  try {
                      return document.execCommand("copy");  // Security exception may be thrown by some browsers.
                  }
                  catch (ex) {
                      console.warn("Copy to clipboard failed.", ex);
                      return prompt("Copy to clipboard: Ctrl+C, Enter", text);
                  }
                  finally {
                      document.body.removeChild(textarea);
                  }
              }
          }

          function copy(){
            copyToClipboard(editor${ id }.getValue())
          }

          document.getElementById(\"copy-${ id }\").addEventListener(\"click\", copy);
          `
        )
      )

      wdg.appendChild(wdg.script)
      // Load your chat data into UI
      return wdg;
    }
  });

  const id = `js${ Math.floor((1 + Math.random()) * 0x10000).toString(16).substring(1) }`;
  const myWidgetInstance = Widget.create(id);
  document.write(`<div id= ${ id } ></div>`);
  document.getElementById(id).appendChild(myWidgetInstance);

  let ifr = document.getElementById(`sandboxed-${ id }`)
  ifr.srcdoc = `
    <!DOCTYPE html>
    <html>

    <head>
      <title>iFrame Simulated Console</title>
      <meta name="description" content="A simple iFrame that runs the attached editor's code">
      <style>
        body {
          color: #ebdbb2;
          font-size: 18pt;
          padding: 10px 3px 10px 10px;
          margin: 0 3px 0 3px;
          font: 16pt/normal 'Monaco', 'Menlo', 'Ubuntu Mono', 'Consolas', 'Source Code Pro', 'source-code-pro', monospace;
          line-height: 26px;
        }
      </style>
    </head>
    <body>
    <div id=\'log-${ id }\'></div>
    <script>
      (function() {
          var old = console.log;
          var logger = document.getElementById(\'log-${ id }\');
          console.log = function (message) {
            if (typeof message == \'object\') {
              logger.innerHTML += (JSON && JSON.stringify ? JSON.stringify(message) : message) + \'<br />\';
            } else {
              logger.innerHTML += message + \'<br />\';
            }
          }
        })();

        window.addEventListener(\'message\', function (e) {
          document.getElementById(\'log-${ id }\').innerHTML=\'\';
          var mainWindow = e.source;
           try {
             eval(e.data);
           } catch (error) {
             console.log(error.name + ': ' + error.message);
           }
         });
     </script>
     </body>
    </html>
  `
})();
Github Repo and Usage
You can also find this widget on github:
 AhmadMoussa
To use it yourself you need to fetch two scripts:
<!-- Ace Editor -->
<script src="https://unpkg.com/ace-builds@1.17.0/src-min-noconflict/ace.js"></script>

<!-- Font Awesome icons for Button symbols -->
<script src="https://kit.fontawesome.com/38006e2401.js" crossorigin="anonymous"></script>
And to use the widget you simply drop it anywhere in your html or markdown file enclosing the code that you want to showcase:
<script type="text/javascript" src='https://cdn.jsdelivr.net/gh/AhmadMoussa/JS-Console-Embed-Widget/src/widget.js'>console.log('hi')</script>And that's a wrap! Let me know if there's any mistakes or improvements that could be done to the widget. Otherwise, if you enjoyed this post consider sharing it with a friend or linking to it on your social and website, it helps out quite a bit! Cheers, and happy programming!