Last week we had fun creating particle systems in collaboration with ChatGPT. Turns out that the large language model is actually quite good at P5JS... when you feed it the right prompts, and iteratively nudge it into the right direction. Today we'll take a seat in the cockpit and write our own particle sketch from scratch.
In the previous post we didn't go into too much detail on how such a particle system works, for a matter of fact, we didn't look at the code at all, took a backseat, and allowed ChatGPT to do all of the heavy lifting. This time around however, we'll delve into the intricacies of coding such a system from the ground up!
Last week's post - a fun way to ease yourself into particle systems
In this post we're going to tackle a number of topics: how to model a particle system with the object oriented paradigm, how to simulate physical forces like velocity and acceleration, and how to compute and resolve collisions between particles within this system. Basically, we'll be learning quite a bit about computing collisions and the physics involved.
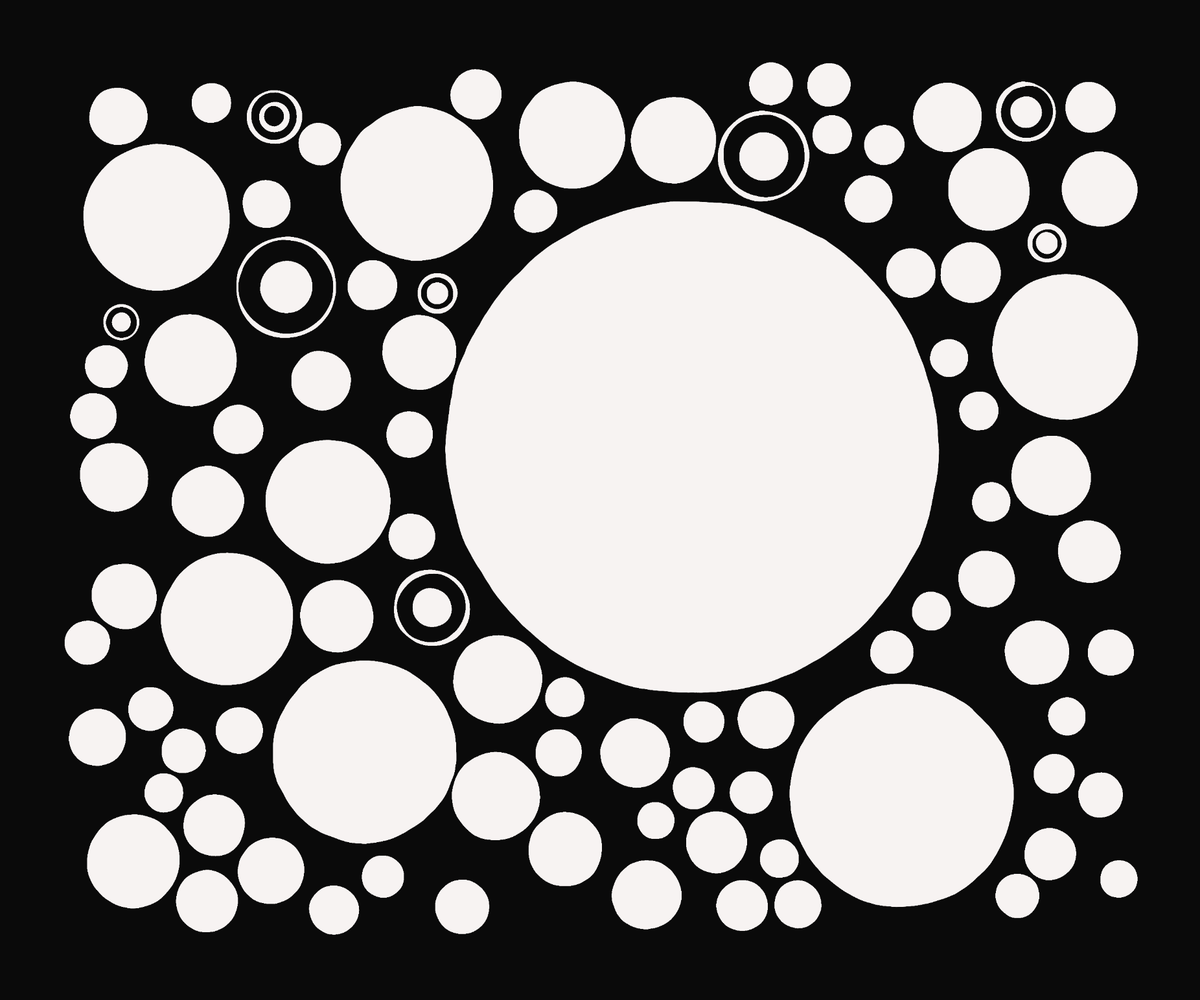
Here's what we'll have put together by the end of this article 👇
Preamble
The best resource on this topic is by far Daniel Schiffman's The Nature of Code. It covers all of the necessary basics that are required for putting together a particle system, starting from vectors and forces, all the way to implementing a full particle system using an Object Oriented Approach.
The Nature of Code is not only one of the best resources on particle systems, but moreover an essential read for every creative coder. Check it out, it's free, and if you like it maybe even get your own copy and support Dan!
If The Nature of Code already exists, then what's the point of this article? The aim of this article is to demonstrate one possible method for implementing such a particle system, with a focus on the computation and simulation of collisions. Many different kinds of systems can emerge depending on the way in which we implement the forces that act upon the particles in this system.
This article sets the scene for creating a simple particle based sketch, in a future post we'll have a look at more complex methods to improve this system and make it more interesting. Let's get started!
What is a Particle System?
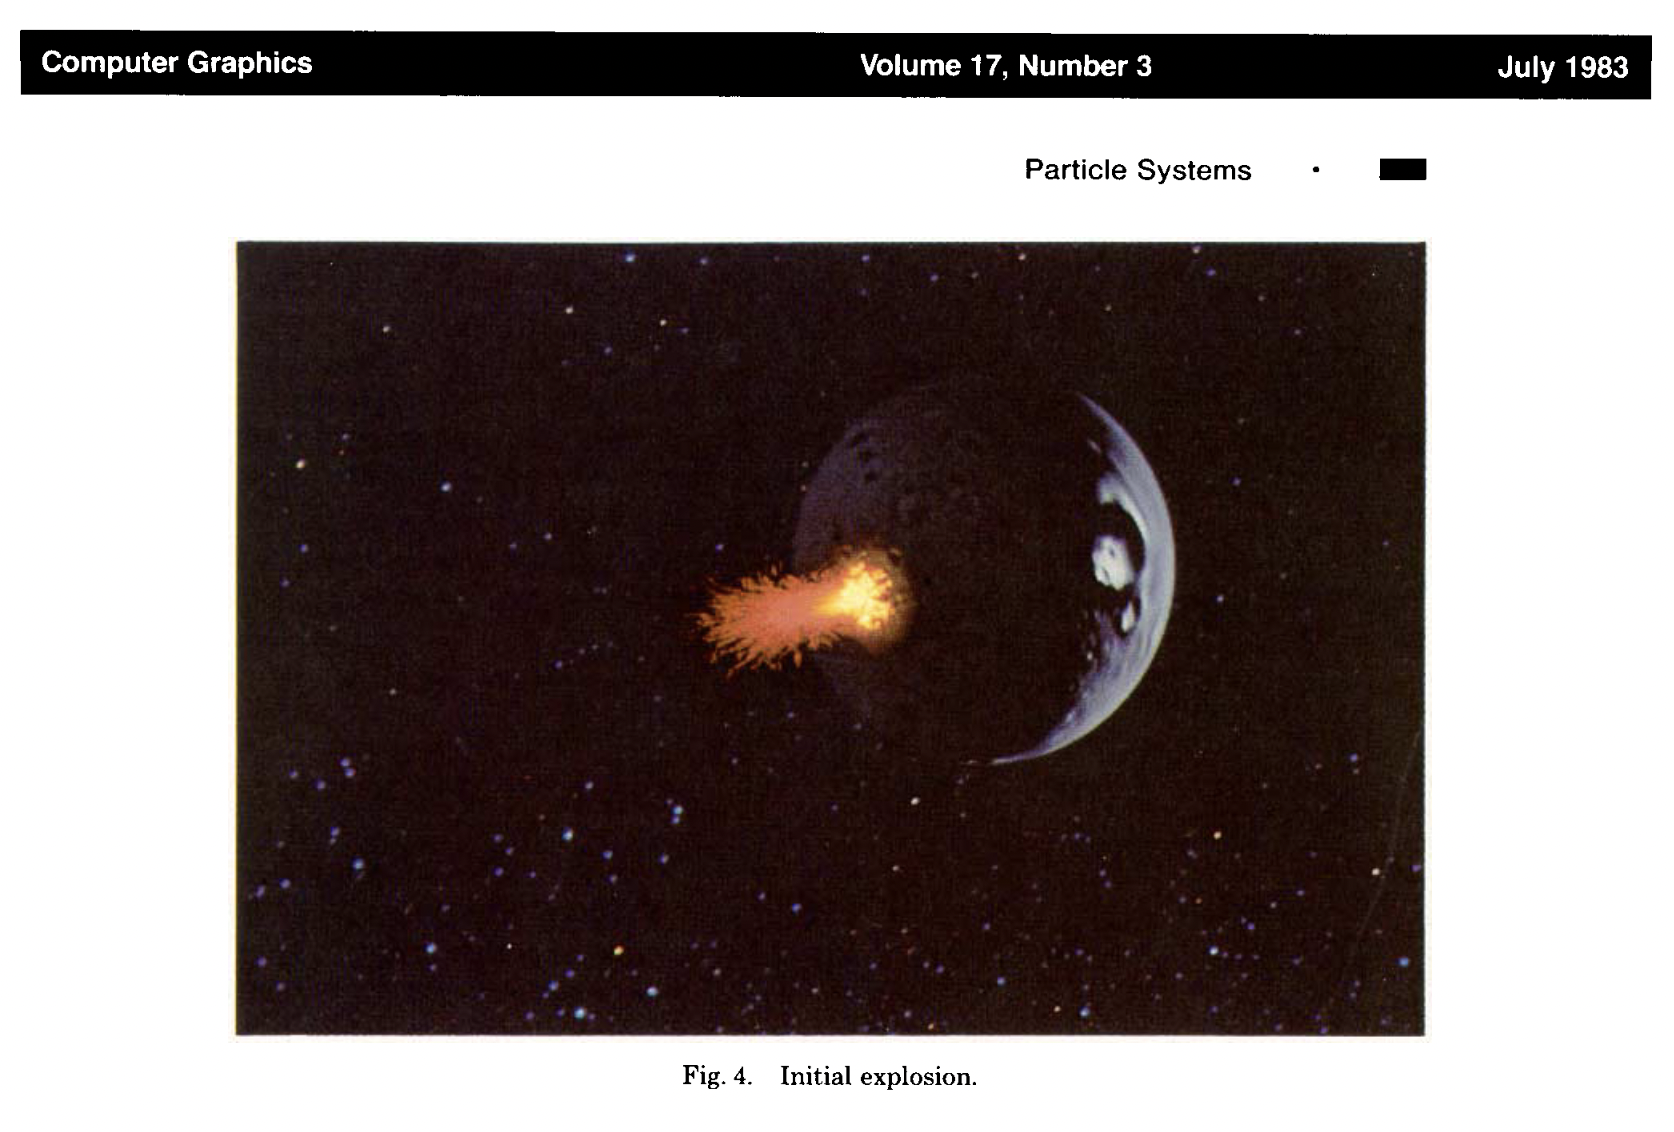
The term Particle System finds it's beginnings with a paper authored by William T. Reeves: Particle Systems – A Technique for Modeling a Class of Fuzzy Objects:
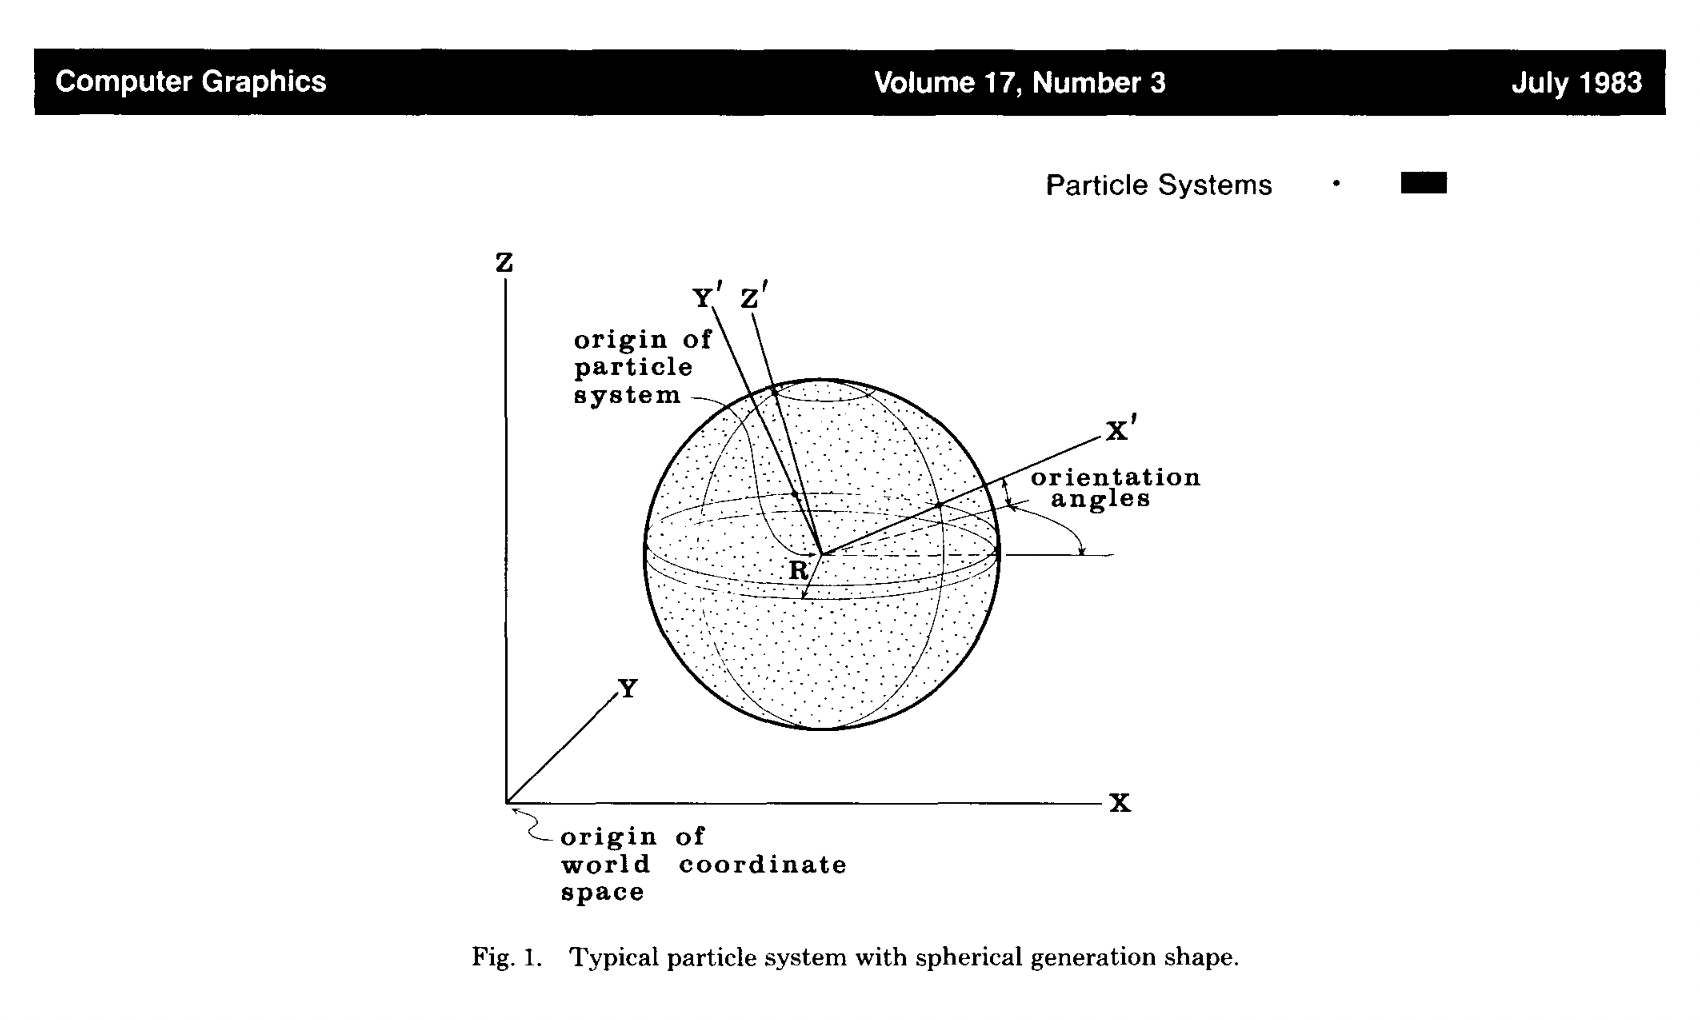
In the paper he describes a method for creating fuzzy-objects, where groups of particles can collectively evoke the illusion of certain shapes or substance. At the time, this method was primarily used in the film industry for the purpose of creating special effects, like fire and smoke:
As it's name suggests, a particle system consists of a non-singular number of particles. And usually, these particles interact with each other in some way to create an interesting effect. Hence the term system.
In this setting a particle is a small object/entity; think of it as a speck of dust, a grain of sand, or even a pebble. Usually each particle in such a system has it's own individual state, as well as it's own properties that allow us to determine how it behaves at any given moment in time.
Depending on the individual state of each one of these particles, the overall system can have various emergent properties. Just like different types of sand feel different to the touch. When wet, some types of sand can even become malleable enough to be shaped into all sorts of forms.
Today, particle systems find their way into most VFX for Movies, Video Games, as well as simulations for scientific research. Although we're only going to concern ourselves with a simple toy-sized exampled of such a particle system, it's nonetheless a very interesting problem.
An Object Oriented Approach
In this section we'll quickly speed-run the Object Oriented Programming Paradigm for those who aren't familiar with it. It will be the foundation upon which we'll build our particle system.
What's the Object Oriented Paradigm
In essence particle systems revolve around the simulation of interactions between a large number of particles. This means that each individual particle needs to be able to remember it's own current state, how it should interact with other particles given certain conditions, and have the ability of reacting accordingly.
One useful approach for this purpose is the object oriented paradigm, or for short OOP. As the name suggests, in OOP we use Objects to model different entities in our program. Objects are essentially containers that can hold a number of variables, and represent a certain state that an Object finds itself in. They can also have functions to simulate potential interactions with other Objects.
And we will essentially model our system with the Object oriented paradigm, such that each particle is an object. We'll represent their properties with the variables that these objects hold. For instance, we can have a variable that represents the current position of a particle (think x and y coordinates), another variable that keeps track of the direction this particle is moving in, and yet another one that describes the speed that it's moving at, etc... then we can also have functions that perform a number of tasks that need to be performed frequently; for instance, checking for collisions with other particles, or updating the value of the descriptive variables when the state of the particle changes.
A preliminary Example
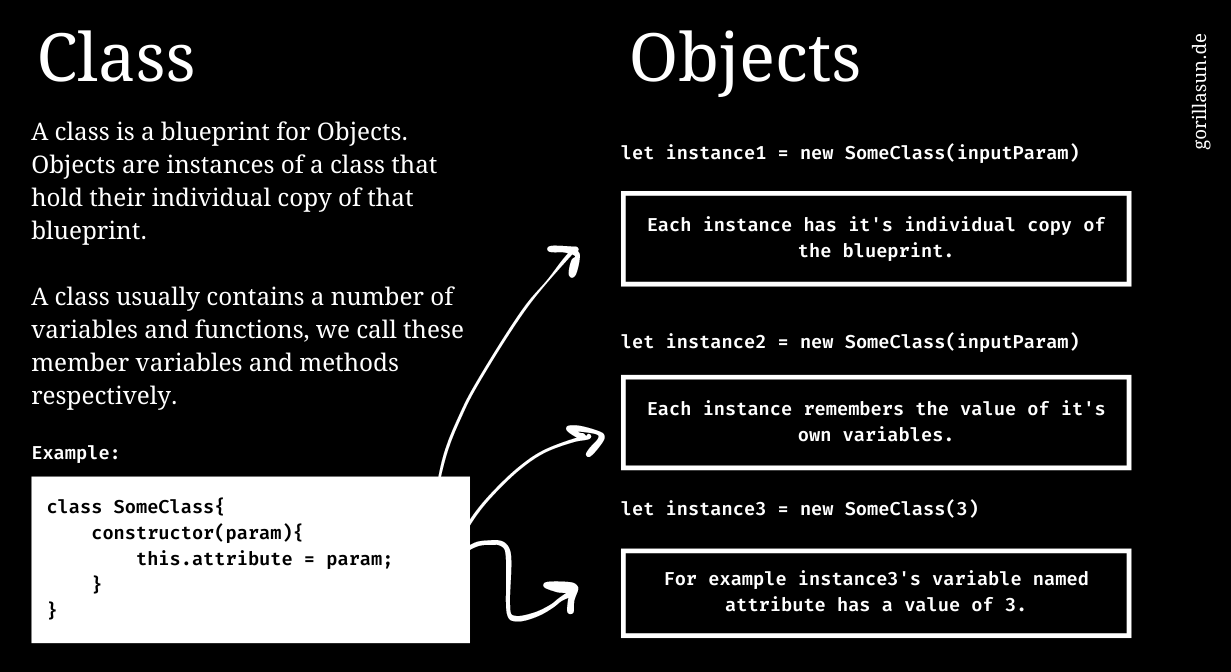
What's cool about OOP is that the code is highly reusable! Generally, in OOP we write blueprints for the different objects that we want to model. These blueprints are also better known as Classes, that can be instantiated to represent individual objects (see graphic above).
In other words, an Object is an instance of a particular class. This allows us to instantiate however many particles we want to have in the our system. This is all a bit abstract in written form, and the lingo can be a bit confusing if it's the first time you hear about these things, hence it's probably better to have a look at a tangible example. Have a peak at the following code:
class Particle{
    constructor(pos){
    	this.pos = pos;
    }

    updateState(newPos){
    	this.pos = newPos;
    }

    printState(){
    	console.log(this.pos);
    }
}
A simple example of a particle class
Here we create a simple Particle class that will serve as a blueprint for the particle Objects in our sketch later on. I want to point out here that there's multiple ways to create Javascript classes - however, since it's introduction with ES6, doing so by means of the class keyword has become the most popular way.
Similarly to declaring a function in Javascript, the class keyword expects to be followed by an identifier. What this identifier is, is ultimately up to us, and in this case it makes sense to call our class Particle. What's special here, is the convention of capitalizing class names - we also don't require parenthesis like we would for declaring a function.
Let's have a look at the content of our Particle class' body now. Right off the bat, functions inside a class are called methods and make do without the function keyword. What's more is that a class requires a special constructor method to be present. This method gets automatically triggered when we create a new instance of the class, and is essential for initializing the instance. It effectuates all of the necessary setup.
For example, when we create a new particle, we want to give it a particular starting position on the canvas, which is done by passing in the coordinates as an input parameter to the constructor. Here's what initializing a new instance of our Particle class would look like:
let pos = {x: 200, y: 200} // arbitrary coordinates
let particle = new Particle(pos)
Alternatively we can also use p5 vectors to represent coordinate pairs.
The new keyword, preceding the name of our class, indicates that we want to create a new instance. Take note of the input signature, it should be identical to the constructor's signature, and automatically triggers the constructor of the class. Now the variable particle holds an instance of the particle class - it is essentially a Particle Object.
Member variables and functions
Another thing that you might have noticed in the constructor function is the special this keyword. When we precede a variable with the this keyword we indicate that the variable belongs to the class. These variables are remembered throughout all parts of the class and can be invoked from anywhere within it.
For example, earlier when we create the Particle class we also created a little function called printState() which simply prints the current position of the particle to the console when we invoke it. We did this simply by accessing this.pos which we created earlier when we created the instances.
let pos = {x: 200, y: 200}; // arbitrary coordinates
let particle = new Particle(pos);

particle.printState(); // prints the coordinates
Variables preceded by the this keyword are called member variables. Similarly, methods that belong to a class can also be called member functions, and, as shown in the example above, can be invoked by prepending the identifier of the variable that holds the instance. We can also access member variables in this manner from an external scope:
let pos = {x: 200, y: 200}; // arbitrary coordinates
let particle = new Particle(pos);

console.log(particle.pos) // same effect as invoking printState()
This concludes our brief introduction to OOP. There's a lot more to be said about, but what we covered is sufficient for the purposes of putting together the particle system that we want to build.
Simulating Physics
Now that we've covered OOP, we also need to talk a little bit about how to simulate physics programmatically. We're essentially trying to model tangible two dimensional entities that behave in a somewhat physically accurate manner, this requires us to implement the forces that occur IRL in nature and that generally cause things to move around.
For this reason, we'll have to talk about velocity and acceleration. To understand these concepts a little bit better let's make a little sketch to help us visualize what's going on. Let's start with a simple P5 sketch with only one particle:
let particle;
function setup() {
  createCanvas(400, 400);

  particle = new Particle(new createVector(200, 200));
}

function draw() {
  background(220);

  particle.display()
}

class Particle{
    constructor(pos){
    	this.pos = pos;
    }

    updateState(newPos){
    	this.pos = newPos;
    }

    display(){
    	ellipse(this.pos.x, this.pos.y, 10)
    }
}
We declare the particle as a global variable and invoke it's display function in the main draw loop.
We'll gradually add complexity and more behaviors to our particle class in the coming sections.
Velocity and Acceleration
Right now, when we display our particle not much is going on yet, the particle simply exists at it's starting position. We'd actually like it to move around, particularly, we'd like it to fall towards the bottom of the canvas, as if there was a gravitational force pulling it downwards.
For this purpose we need to give our particle two more properties, namely velocity and acceleration. By setting the velocity and acceleration of our particle to specific values and letting them act upon it's position, we can make it move around on the canvas. What is a particle's velocity though? And what is acceleration?
Imagine you're riding a bicycle. Your Velocity describes how fast you're going, and it also tells us in which direction you're going. If you're riding forward at a steady speed, your velocity is positive. But if you're riding backward, your velocity is negative because you're going in the opposite direction.
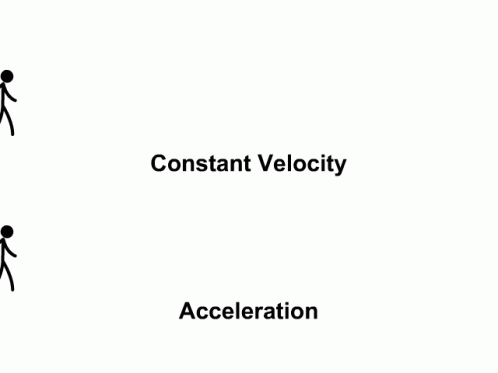
Acceleration on the other hand, is how quickly your speed or direction changes. Let's say you're riding your bike and you start pedaling harder. That means you're accelerating because you're increasing your speed. Acceleration can also happen when you slow down or stop suddenly. It's like when you're riding your bike and you hit the brakes really hard.
In this sense, velocity is a force that acts upon the position of an object, and acceleration is a force that acts upon the velocity of an object. Both are necessary to accurately simulate the movement of an object. Additionally, both have a direction and magnitude, and can as such be represented as vector quantities - which means that we can use the inbuilt P5 vector functions to make this task a little bit easier.
Let's modify our Particle class to include these forces:
constructor(pos){
    this.pos = pos;
    this.velocity = new createVector(random(-1,1), random(-1,1));
    this.acceleration = new createVector(random(-1,1), random(-1,1));
}
The initial velocity is a random vector, meaning that the particle is moving in a random direction when it spawns on the canvas. The acceleration on the other hand is a vector that has a small value for it's y component and a zero value for x. This simulates a fake gravity effect.
Now we can apply these two forces to the position of our particle to make it move:
updateState(){
    this.velocity.add(this.acceleration);
    this.pos.add(this.velocity);
}
Since there is nothing preventing the particle from leaving the canvas yet, you might have to rerun the sketch to see the particle.
Canvas Boundary Collision
We don't want our particle to leave the canvas and wander off into the aether beyond, but rather we'd like it to collide with the boundaries of the canvas and bounce off of them.
For this we'll create a function in which we'll update it's velocity and acceleration accordingly. At this point it makes sense t0 give our particle a specific radius such that we can accurately determine it's collision with the canvas boundaries:
constructor(pos){
    this.pos = pos;
    this.velocity = new createVector(random(-1,1), random(-1,1));
    this.acceleration = new createVector(random(-1,1), random(-1,1));

    // random radius within a range
    this.radius = random(5, 15);
}

display(){
    // size of ellipse is the radius
    ellipse(this.pos.x, this.pos.y, this.radius)
}
And the function that will check for collisions with the canvas boundaries:
checkEdges() {
    if (this.pos.x - this.radius < 0) {
      this.pos.x = this.radius; // Prevent from leaving the canvas from the left side
      this.velocity.x *= -1;
    } else if (this.pos.x + this.radius > width) {
      this.pos.x = width - this.radius; // Prevent from leaving the canvas from the right side
      this.velocity.x *= -1;
    }

    if (this.pos.y - this.radius < 0) {
      this.pos.y = this.radius; // Prevent from leaving the canvas from the top
      this.velocity.y *= -1;
    } else if (this.pos.y + this.radius > height) {
      this.pos.y = height - this.radius; // Prevent from leaving the canvas from the bottom
      this.velocity.y *= -1;
    }
  }
We simply need to check for each one of the four boundaries if the radius of our particle exceeds this boundary.
As we mentioned earlier, the velocity of our particle represents the direction that it is moving towards, and since the canvas boundaries are aligned with the x and y coordinate axes we can simply flip the sign of the particle's respective velocity component to make it move into the opposite direction. For example, when a particle collides with the bottom of the canvas we will simply flip the y component of it's velocity, making it move upwards again.
And in action this looks as follows:
Not incredibly mind-blowing what we've got so far, but we've got a good system in place. Next we'll work on adding multiple particles.
Multiple Particles and their Collisions
In this section we'll modify our sketch in such a way that it can support multiple particles. This requires us to define how these particles should interact with each other. Right now, if we were to add more than one particle, they would simply ignore each other and not interact in any meaningful way.
Instead of just creating a singular particle, we'll now introduce an array that can store multiple particles at once:
let N_PARTICLES = 50;
let particles = [];

let WID = 400;
let HEI = 400;

function setup() {
  createCanvas(400, 400);

  for(let n = 0; n < N_PARTICLES; n++){
    particles.push(
        new Particle(
            new createVector(random(WID), random(HEI))
        )
    );
  }
}
And in the draw loop we will simply loop over all of the particles to update their individual positions and determine if they're colliding with the borders of the canvas:
function draw() {
  background(220);

  for(let p of particles){
    p.checkEdges();
    p.updateState();
    p.display();
  }
}
Now the sketch is already much more interesting:
An interesting thing we can do here is visualizing he velocity of each particle:
Collisions between Particles
Computing collisions between two particles is slightly more difficult than computing the collision between a particle and the boundaries.
For the boundaries we could get away with simply directing the particle in the opposite direction - when two particles collide however, we need to consider at what angle they are colliding, as well as how fast they're moving when they meet.
In this setting we are concerned with the collision response of the two particles. The collision response is essentially the behavior of the particles when they collide. This behavior can be vastly different depending on how we model the physics of our system, for instance if we want our particles to be elastic, or rigid, or even a mix of both, etc. Just like in the real world, you'll observe a different response when you drop a book flat on the floor as opposed to a bouncy ball.
To resolve the collision between two particles correctly we need to compute a number of things:
- Relative Velocity: the relative velocity is essentially the difference in velocities between the two particles. It informs us about how fast the two particles are approaching each other and is necessary to determine the strength of the impact. This lets us calculate how rapidly the two particles will part ways again.
- Collision Normal: the collision normal is a perpendicular to the collision surface and is necessary to determine in which direction the particles will move after colliding.
- Impulse Magnitude: the impulse magnitude is the strength of force applied to the particles after collision.
Computing the Collision Responses
Now let's add a function that A. checks for collisions and B. computes the collision response between the two particles subsequently updating the velocity of the particle:
checkCollision(){
    for(let other of particles){
      if(this != other){
        let distance = this.pos.dist(other.pos);
        let minDistance = this.radius + other.radius;


        if(distance <= minDistance){
          // Calculate collision response
          let normal = p5.Vector.sub(other.pos, this.pos).normalize();
          let relativeVelocity = p5.Vector.sub(other.velocity, this.velocity);

          // divide by two, we'll explain why in a bit
          let impulse = p5.Vector.mult(normal, 2 * p5.Vector.dot(relativeVelocity, normal) / 2);

          // Update velocities
          this.velocity.add(impulse);
          other.velocity.sub(impulse);
        }
      }
    }
  }
Here we can make heavy use of p5's inbuilt vector functions.
We'll add a new function to the particle class called checkCollision(). In this function we will loop over all of the other particles and compute the distance between their positions, if this distance is less than the sum of their radii then we can ascertain that a collision has occurred.
When a collision occurs we'll have to compute the collision response, which is constituted of the forces that we discussed earlier.
Hold up... there's something not right here. Even though the particles bounce off of each sometimes, it will not always work correctly and they'll get stuck on each other. Let's visualize their velocities again and see what's happening:
Because this is just a numeric simulation it can happen that two particles will interpenetrate each other. When this happens it can lead to a faulty calculation of the relative velocity and in turn make it such that they become stuck on each other.
To remedy this we will add an additional force that pushes the two particles in opposite directions when they're close to each other, preventing them from getting stuck on each other.
// Apply repulsion force to prevent sticking
let repulsion = p5.Vector.mult(normal, minDistance - distance);

// Apply repulsion force
this.pos.sub(repulsion);
other.pos.add(repulsion);
The repulsion force is added here.
And now things should be behaving more accurately:
The Mass of Particles
So far we have worked under the assumption that all particles have the same mass, even when they're of different size. Mass represents the amount of matter contained in an object, and mass affects the forces the impact of the forces exerted on an object. The more massive an object the more force we need to move it; following Newton's second law.
Let's update our calculations to reflect this! First let's add another member variable to represent the mass of a particle:
constructor(pos){
    this.pos = pos;
    this.velocity = new createVector(random(-1,1), random(-1,1));
    this.acceleration = new createVector(random(-1,1), random(-1,1));

    // random radius within a range
    this.mass = random(1,5)
    this.radius = this.mass*3;
}
And in our calculations we just need to divide certain values by the mass of the particle, diminishing the impact of the forces on the velocity of the particle:
checkCollision(){
    for(let other of particles){
      if(this != other){
        let distance = this.pos.dist(other.pos);
        let minDistance = this.radius + other.radius;


        if(distance <= minDistance){
           // Calculate collision response
          let normal = p5.Vector.sub(other.pos, this.pos).normalize();
          let relativeVelocity = p5.Vector.sub(other.velocity, this.velocity);
          let impulse = p5.Vector.mult(normal, 2 * p5.Vector.dot(relativeVelocity, normal) / (this.mass + other.mass));

          // Apply repulsion force to prevent sticking
          let repulsion = p5.Vector.mult(normal, minDistance - distance);

          // Update velocities
          this.velocity.add(p5.Vector.div(impulse, this.mass));
          other.velocity.sub(p5.Vector.div(impulse, other.mass));

          // Apply repulsion force
          this.pos.sub(p5.Vector.div(repulsion, this.mass));
          other.pos.add(p5.Vector.div(repulsion, other.mass));

        }
      }
    }
  }
And visually we obtain the following effect:
This is now much more like real life where things don't just keep bouncing around forever, because the particles will gradually lose their velocity as they collide. Later we should also reflect the loss of this momentum when they collide with the boundaries, but I believe that this is a good stopping point for now.
Closing Thoughts
Although our sketch is working relatively well thus far, there's many more things that we can add here to make it much more interesting - we'll cover these optimizations in the post of next week. We'll have a look at how to implement a grid lookup to improve the speed at which collisions are determined and some methods for improving our collision resolutions to simulate different effects, like elasticity and restitution.
We'll also add mouse interaction to the sketch, such that we can spawn particles by pressing the mouse, and additionally implement other types of attractive and repulsive forces that can be applied to the particles in our system.
Until then, cheers and happy sketching ~ Gorilla Sun