One continuous big source of inspiration for me has been Processing's Discover Tab, where you can browse sketches from different users and see what they have come up with.
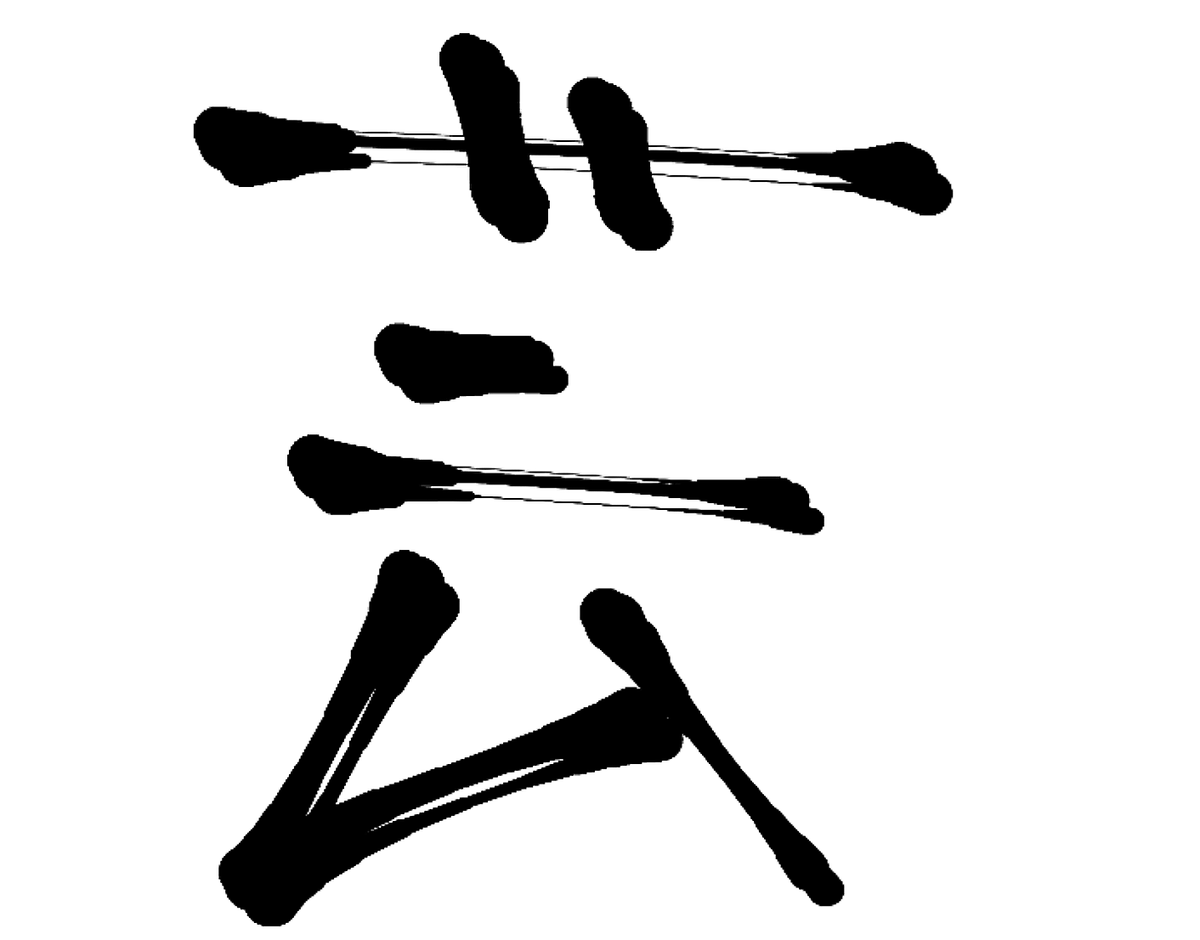
Recently one in particular caught my eye, that allows you to draw brush strokes in a style reminiscent of the far east. The behaviour of these brush strokes felt very fluid and responsive, so I dug little deeper and had a look at the code (you can view the code for every sketch on there!).
The sketch was made by Twitter user @BUN_information, and has even made a very nice tutorial for his code here.
OpenProcessinghttps://t.co/pQxLY5e50H
— BUN (@BUN_information) November 15, 2019
GitHubhttps://t.co/DZBU9LhTue
「解説書くならせっかくだし」と思ってOpenProcessingのTutorial Modeを使ってみたけど…
油断するとすーぐ文章長くなりがち。そして解説になってない。英語も正しいかどうか怪しい。
いいよもう。ふーんだ。#Processing https://t.co/nRRqkppCIy pic.twitter.com/kmg5xdplHs
This blog post's purpose is to explain and adapt this code for p5js. BUN divides his tutorial into 6 parts, where each part introduces new behaviour and comlexity to the brush stroke. The first part is very simple, we simply draw circles at the cursor's location and go from there:
function setup() {
  createCanvas(400, 400);
}

// brushSize simply is the thikness of the brush stroke
let brushSize = 20;
function draw() {
  if(mouseIsPressed) {
    strokeWeight( 3 );
    circle( mouseX, mouseY, size );
  }
}

The second step will actually improve the drawing behaviour significantly by implementing Hooke's Law. Essentially, we're not drawing the ellipses at the exact mouse coordinates anymore, but are applying a modifiers to the coordinates. It will almost feel like the drawn ellipses are dragged behind the mouse cursor, as if they were attached to a spring, and once you stop moving the cursor, it will actually overshoot and then snap back ellastically to a resting position. I'm not a physics whizz, but I will try my best at explaining the concept.
Picture an imaginary spring, where one end is attached to the circle that we're drawing, and the other end is connected to your cursor. This spring has an ellastic behaviour, when you begin dragging one end, meanwhile the other end, to which our circle is attached, will start dragging behind it. The faster you drag one end the more this spring will be stretched out and the harder the snap-back will be when you come to a rest. The trick here is to somehow simulate this behaviour, and it can be done with Hooke's Law.
Hooke's Law states that the force F by which a spring is displaced can be calculated with the following formula:
F = k*xWhere x is the amount of displacement from the beginning of dragging the spring, and k is a parameter characteristic of the spring. We can actually choose this parameter, which simply signifies the elasticity of the spring. In BUN's code, we first calculate the velocity of our cursor while it is moving (velocity being a vector quantity that defines the distance traveled over some period of time).
The amount of displacement is simply the distance between the moment we pressed the mouse to where we moved the mouse, and will be the x parameter in Hooke's formula. For now well simply choose k to be 0.5 for a balanced behaviour (k should be between 0 and 1). One thing to note here, is that we need to calculate the formula for both x and y coordinates, since we're moving on a 2D plane:
vx += ( mouseX - x ) * spring;
vy += ( mouseY - y ) * spring;
Now, we would end up with a very erratic behaviour, where the spring seems to never come to a stop, and keeps oscillating around the cursor's rest position:

This is because we ignored one variable that occurs in the physical world: friction. Friction, like the spring parameter, is a variable between 0 and 1, where values closer to 1 designated less friction and values closer to zero designate more friction. We simply multiply our velocity by this friction parameter. And we will obtain a nice behaviour. The code should look like this now:
function setup() {
  createCanvas(400, 400);
}

// brushSize simply is the thikness of the brush stroke
let brushSize = 20;
let f = 0.5;
let spring = 0.5;
let friction = 0.5;
function draw() {
  /*
    Smoother movement than using mouse coordinates
  */
  /*
    Parameters used
      size : Brush size
      spring : Spring constant(Larger value means stronger spring)
      friction : Friction(Smaller value means, the more slippery)
  */

  if(mouseIsPressed) {

    if(!f) {
      // Initialize coordinates
      f = true;
      x = mouseX;
      y = mouseY;
    }

    // Calculate velocity
    /*
      MEMO : Use Hooke's law to make spring motion
        DistanceX = (X1 - X0)
        SpringConstant = (value between 0 and 1)
        AccelerationX = DistanceX * SpringConstant
        VelocityX = ( VelocityX + AccelerationX ) * Friction
    */
    vx += ( mouseX - x ) * spring;
    vy += ( mouseY - y ) * spring;
    vx *= friction;
    vy *= friction;

    x += vx;
    y += vy;

    // Draw at the calculated coordinates
    strokeWeight( 3 );
    circle( x, y, brushSize );  // AMEND: mouseX, mouseY -> x, y

  } else if(f) {
    // Reset state
    vx = vy = 0;
    f = false;
  }
}
It might not be very obvious from the gif, but it's remarkable if you try it yourself.

In the third part of the tutorial, we begin making some changes to make the drawn circles look more like strokes, rather than just circles. Generally, in chinese, japanese and korean calligraphy, symbols can be drawn in different styles and different speeds, where the speed at which the calligraphy is made is a characteristic feature. When drawn slow, strokes tend to be thicker and heavier; when drawn faster, less pressure is put on the strokes and they tend to be thinner. This is what BUN tries to achieve in this part of the tutorial, drawn circles should be smaller (thinner), in the middle portion of the stroke, the start and end points of the stroke should be thicker, as more pressure is put on the brush.
This behaviour can be simulated by calculating the stroke thickness as a function of the velocity. Essentially, the faster we are drawing, the higher the velocity, the thinner is our stroke.
v += sqrt( vx*vx + vy*vy ) - v;
v *= 0.6;
We also need to ensure a minimum width of 1, so that the stroke doesn't completely vanish.

In part 4, we actually make the stroke look much more like a stroke than just ellipses. It's actually very impressive how stacking these simple rules allow us to simulate such complex behaviour. Here, instead of drawing separate circles, we'll draw lines between the points where we would have drawn circles instead, this can be done by simply adding an intermediary variable that stores the previous circles coordinates.

However you can see that the different line segments that make up the stroke can look a little discontinuous and jagged when drawn at higher speeds. Part 5 tries to ammend this by splitting up the line segments into multiple smaller chunks to smooth these portions.
for( let i = 0; i < splitNum; ++i ) {  // ADD
      oldX = x;
      oldY = y;
      x += vx/splitNum;  // AMEND: vx -> vx/splitNum
      y += vy/splitNum;  // AMEND: vy -> vy/splitNum
      oldR += (r-oldR)/splitNum;
      if(oldR < 1) { oldR = 1; }  // AMEND: r -> oldR
      strokeWeight( oldR );  // AMEND: r -> oldR
      line( x, y, oldX, oldY );
}
Where you can choose a value for the 'splitNum' parameter, that determines into how many subsegments you want to split your lines.

We could already stop here, but the last part will put a finishing touch on our brush strokes and make them look much more realistic. In part 6 we draw multiple lines offset from each by a tiny amount and make them have variable thickness:

The final code will look like this:
function setup() {
  createCanvas(1000, 1000);
}

// brushSize simply is the thikness of the brush stroke
let brushSize = 40;
let f = 0.5;
let spring = 0.4;
let friction = 0.45;
let v = 0.5;
let r = 0;
let vx = 0;
let vy = 0;
let splitNum = 100;
let diff = 8;
function draw() {
  if(mouseIsPressed) {
    if(!f) {
      f = true;
      x = mouseX;
      y = mouseY;
    }
    vx += ( mouseX - x ) * spring;
    vy += ( mouseY - y ) * spring;
    vx *= friction;
    vy *= friction;

    v += sqrt( vx*vx + vy*vy ) - v;
    v *= 0.6;

    oldR = r;
    r = brushSize - v;

    for( let i = 0; i < splitNum; ++i ) {
      oldX = x;
      oldY = y;
      x += vx / splitNum;
      y += vy / splitNum;
      oldR += ( r - oldR ) / splitNum;
      if(oldR < 1) { oldR = 1; }
      strokeWeight( oldR+diff );  // AMEND: oldR -> oldR+diff
      line( x, y, oldX, oldY );
      strokeWeight( oldR );  // ADD
      line( x+diff*1.5, y+diff*2, oldX+diff*2, oldY+diff*2 );  // ADD
      line( x-diff, y-diff, oldX-diff, oldY-diff );  // ADD
    }

  } else if(f) {
    vx = vy = 0;
    f = false;
  }
}
And this is about it! Many thanks to BUN for sharing his code, and I recommend giving him a follow on OpenProcessing or on Twitter to keep up with his creations! There are actually many different algorithms for simulating brush strokes, which I might cover when I learn more about them! Cheers, if you enjoyed this post consider giving me a follow on Twitter and sharing this, until next time!