- Points along the Diagonal
- Making the Points Wiggle
- Varying point Size
- Attenuating the Movement
- Positioning Wireframe Joints
- Drawing the wireframe connections
- Final Touches
- Squiggly Perlin Noise Movement
Points along the Diagonal
As always, let's start with some boilerplate stuff:
function setup() {
  w = min(windowWidth, windowHeight)
  createCanvas(w, w);
}

function draw(){
  background(220);
}
Very basic stuff here, we're setting up the canvas to take as much space as it has available, and ensure that it is always square in shape by setting both it's width and height to the smaller one of the two by using the min() function.
Points along the diagonal can simply be drawn with a single for loop. The points' x and y coordinates will both be set to the value of x. Also as usual, we have an offset parameter 'off' and a spacing parameter 'spc' that we declare in the setup function to determine from where to where our for loop spans. Try changing them and see how the drawn points appear!
Making the points wiggle
Wiggling motion can generally be achieved with a sine wave, which we'll use to oscillate the position of the points:
t = frameCount/50;

for(x = off; x
Doing it like this, you'll notice that all the points are moving side to side at the same time. However we'd like them to move in a serpent/worm like manner, we need to input something in addition to time into the sin() function to offset them differently. And we actually already have something that is unique to each point: it's position!
Try plugging different things into the two sines and see how the behaviour changes.
Varying point Size
If you've read either one of my previous two tutorials this trick will be familiar to you. Here we'll increase the size of the points the closer they are to the center of the sketch:
d = dist(x,x,w/2,w/2)
dmap = map(d, 0, w/2+off/2, 1, 0)
strokeWeight(dmap*10)
We'll make use of the inbuilt dist() function to compute the distance of each specific point towards the center, and then map from that range to a [0 - 1] range.
There's a little problem here though. We're not taking into account the distance of the point while it's wiggling side to side with our sin() function. We can fix this by using intermediary variables to store the location:
offsetAmount = 50;

x1 = x + offsetAmount * sin(x + t);
x2 = x - offsetAmount * sin(x + t);

d = dist(x1, x2, w / 2, w / 2);
dmap = map(d, 0, w / 2 + off / 2, 1, 0);
strokeWeight(dmap * 10);

point(x1, x2);
Now we'll notice that the points' size varies ever so slightly while they pass back and forth over the center of the sketch:
We also added a variable 'modifier' to easily control the oscillating motion of the points.
Attenuating the movement
We can also repurpose the distance from the center to control the amount of movement that a single point will make. The closer to the center, the further out it will swing. The further from the center, the less distance it'll travel side to side.
We simply recalculate x1 and x2 but also multiply by the dmap parameter. Since it is in the range of [0 - 1], if it closer to the center the value will be closer to 1 and we're oscillating the point near it's max offset amount. If it's closer to 0, we're moving the point side to side only at a fraction of it's max range.
Positioning Wireframe Joints
Calling it a wireframe is a generous description. Since we're essentially still in 2D this part of the sketch will simply give the illusion of being 3D. For now we'll simply position some dots equidistantly on a circle that spans around each of the dots that we've already positioned so far:
rad = 40*dmap;
strokeWeight(5*dmap)

for(a = 0 ; a< TAU; a+=TAU/3){
  px = x1 + rad*cos(a);
  py = x2 + rad*sin(a);

  point(px,py)
}
We're also going to make these points spin in the following manner:
Neat right? We already have some very interesting motion going on! Here we simply plugged the frameCount value into the loop that determines the angle of the little points around the larger points, hence making them rotate.
Drawing the wireframe connections
First we'll draw the lines that connect the rotating points:
rad = 40*dmap;
for(a = t; a< TAU+t; a+=TAU/3){
  strokeWeight(5*dmap)
  px = x1 + rad*cos(a);
  py = x2 + rad*sin(a);

  point(px,py)

  prevx = x1 + rad*cos(a+TAU/3);
  prevy = x2 + rad*sin(a+TAU/3);

  strokeWeight(1)
  line(px,py,prevx,prevy)
}
We can simply do so by offsetting the angle and drawing a line between these two points. More neatly we can write it like this:
rad = 40*dmap;
div = TAU/3
for(a = t; a< TAU+t; a+=div){
  strokeWeight(5*dmap)
  px = x1 + rad*cos(a);
  py = x2 + rad*sin(a);

  point(px,py)

  prevx = x1 + rad*cos(a+div);
  prevy = x2 + rad*sin(a+div);

  strokeWeight(1)
  line(px,py,prevx,prevy)
}
Try changing the div parameter in the following code and see what shapes you can get!
Next up will be connecting joints in between different segments, for which we'll need to remember the position of the previously drawn point:
rad = 40 * dmap;
div = TAU / 4;
for (a = t; a < TAU + t; a += div) {
  strokeWeight(5 * dmap);
  px = x1 + rad * cos(a);
  py = x2 + rad * sin(a);

  point(px, py);

  prevx = x1 + rad * cos(a + div);
  prevy = x2 + rad * sin(a + div);

  strokeWeight(1);
  line(px, py, prevx, prevy);

  connectx = prevx1 + rad * cos(a);
  connecty = prevx2 + rad * sin(a);

  line(px,py,connectx, connecty)
}

prevx1 = x1;
prevx2 = x2
You can see that at this point we're already starting to run out of meaningful names for our variables. The struggles of the creative coder. Either way, doin it like this we'll notice a number of problems. There is an ugly segment drawn straight across the sketch, and the lines don't allign cleanly with the previous joints:
The ugly line can simply be fixed with the addition of a counter that checks if we're in the first iteration of the loop or not. Or alternatively we can check if x is equal to to 'off', that would mean that we're still in the first iteration of the loop. In that case we skip drawing the line.
Additionally, we need to remember the previous radius, to make the lines connect to the joints exactly. This can be remedied by an additional variable that stores the radius:
Final Touches
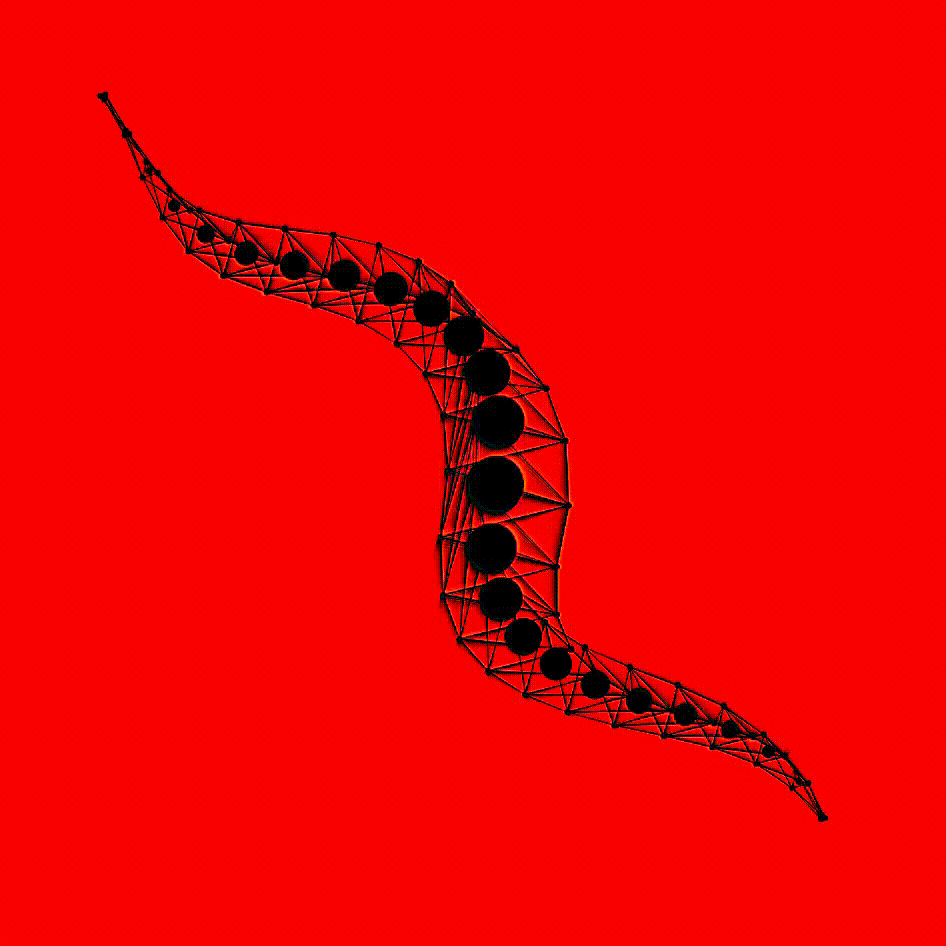
Squiggly Perlin Noise Movement
One last thing I'd like to touch upon is how you could add a little more interesting motion to the sketch. It's a very simple modification:
angleOffset = noise(x1/50)*TAU
for (a = t + angleOffset; a < TAU + t + angleOffset; a += div) {
// ...
}
We simply add this additional modifier to the loop that determines the angle of rotation of the wireframe joints. What are we actually doing here? We are taking the variable x1 of each point and feed it to the noise function. The noise function gives an output in the range [0, 1] which we multiply by TAU to get a meaningful angle. And since x1 is oscillating between two values over and over again, this additionaly noisy value that we add to the angle also loops seamlessly!
The entire code would look like what follows:
And that's pretty much everything that went into making this little squiggly sketch. There are a few more things that I did for my Centripede sketches that differentiate it from this (which I probably will talk about in a future blog post), but roughly, it's this code that I built upon. If you enjoyed reading this, considering sharing this tutorial with your friends! Otherwise, happy sketching and cheers!